Running out of time but still want to add some spooky charm to your Halloween setup? These 20 quick and simple DIY Halloween props are perfect for last-minute decorating! From eerie candle holders and haunted mirrors to creepy-crawly jars and ghostly silhouettes, these ideas are easy to make with materials you likely have on hand. Whether you’re throwing a Halloween party or just looking to surprise trick-or-treaters, these fun and festive props will transform your space in no time. Get ready to create a spooky atmosphere without the stress!
All photos provided are original and can be used as a reference for your own art crafts.
Table of Contents
Craft Paper Witch Hat
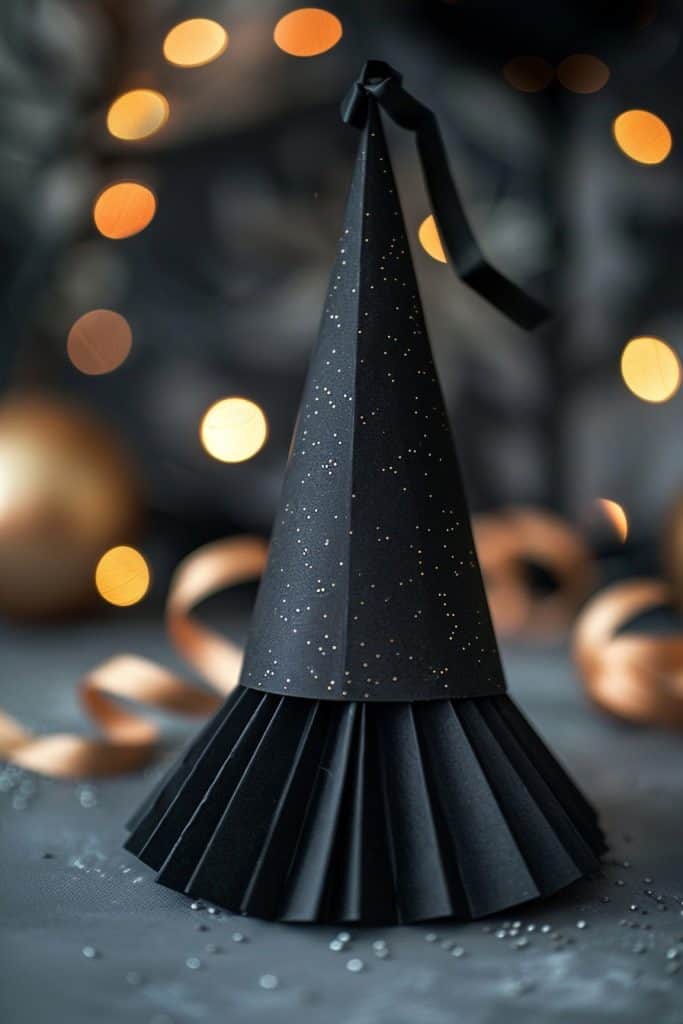
Alright, so you wanna draw this cool little party hat thing? The big skill you’re gonna need to nail is perspective drawing. That cone shape is trickier than it looks! I remember the first time I tried drawing a witch’s hat for Halloween – total disaster. But once you get the hang of it, you can make all sorts of fun pointy objects.
The key is getting those pleats at the bottom to look right. See how they fan out? That takes some practice to make it look natural and not all wonky. I’d start by sketching out the basic cone shape, then adding in those pleats bit by bit. Oh, and don’t forget the sparkly bits! That’s where your shading skills come in handy. Little dots and dashes can really make it pop.
You know what though? The lighting in this pic is super cool. Those blurry orange lights in the background… I’m not totally sure how I’d capture that effect in a drawing. Maybe some kind of soft pastel smudging? Anyway, it really sets the mood. Makes me think of New Year’s Eve parties. I once made a bunch of these hats out of old sheet music for a friend’s party – they looked pretty sweet, if I do say so myself. Anyway, where was I? Oh yeah, perspective and shading. Focus on those and you’ll be churning out party hats left and right in no time!
Paper Plate Pumpkin
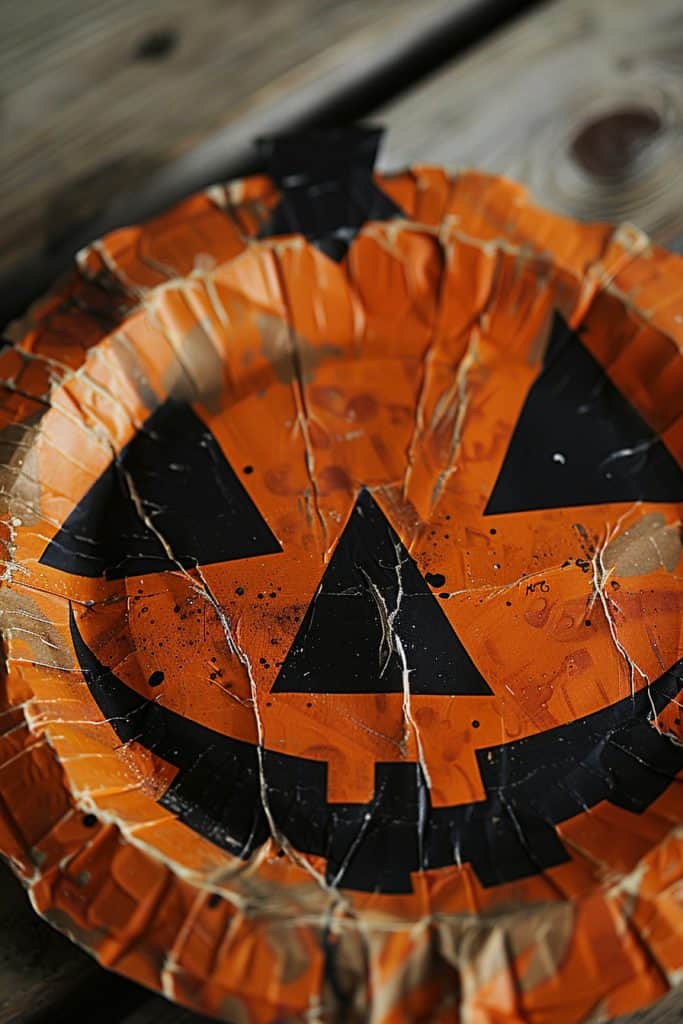
Honestly, this jack-o’-lantern paper plate could be way simplified for a beginner to draw. I’d start with just a basic orange circle – no need to fuss with the plate ridges. Then sketch out those big triangle eyes and the zigzag mouth. Honestly though, the nose is kinda tricky. Is that supposed to be a triangle or more of a diamond shape? I can’t quite tell. Maybe just go with a simple triangle nose to keep it easy.
For materials, looks like they used orange and black construction paper here. But y’know what? I tried something similar last Halloween and ended up using markers instead. Way less messy, especially for kids. Plus you don’t have to deal with glue drying and paper curling up. Although come to think of it, the texture of torn paper edges can look pretty cool… Anyway, where was I? Oh right, simplifying it.
So yeah, stick to the basic shapes for a beginner version. Circle for the pumpkin, triangles for eyes and nose, jagged mouth. Skip all the little details like those cobweb-looking strings and paint splatters. Those are neat but definitely advanced level stuff. Focus on getting the main Jack-o’-lantern face recognizable first. Once you’ve got that down, then you can start playing around with adding extra spooky touches. Man, now I kinda want to go make one myself again. Maybe I’ll dig out my craft supplies this weekend and give it another go. You ever notice how making Halloween stuff always puts you in a festive mood?
Bat Cut From Felt
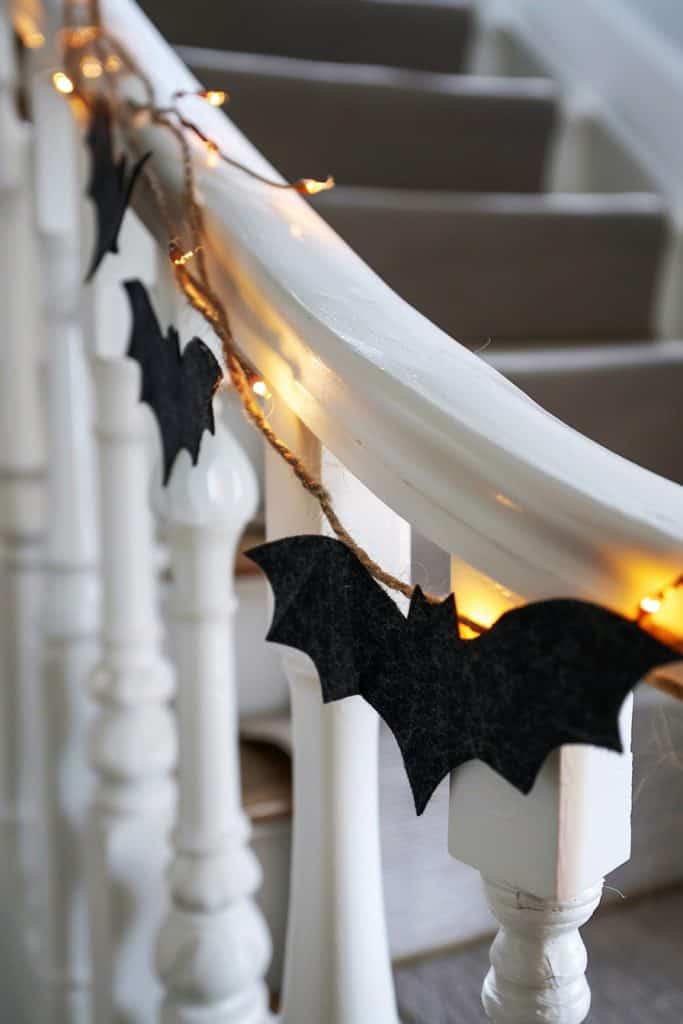
Oh wow, this is such a cool Halloween staircase decoration! I’m loving the the way they’ve combined those string lights with the bat cutouts – it’s simple but super effective.
The subtle detail that really makes this pop is how they’ve draped that gauzy white fabric over the banister. It softens everything and gives it this ethereal, ghostly vibe that’s perfect for Halloween. I did something similar last year but used orange lights instead of white – kinda wish I’d gone with white now, it looks way more elegant.
Anyways, for the bats, it looks like they’ve used some kinda black felt or maybe construction paper? Hard to tell for sure from the pic. But that material choice is smart cuz it’ll hold its shape better than regular paper. I really, really love how they’ve varied the sizes of the bats too – adds depth and makes it feel more natural, like a real swarm. (Speaking of bats, did you know they’re actually super beneficial for pest control? But I digress…)
One thing I’m not 100% sure about is how they’ve attached everything. Might be fishing line or clear tape? If you’re trying this at home, just be careful not to damage your banister!!! Maybe use removable adhesive hooks if you’re worried.
Oh, and pro tip from someone who’s made this mistake – make sure to space out your lights evenly before adding other elements. Nothing worse than realizing your lights are all bunched up at one end after you’ve already attached all your decorations!
Mummy Made From Mason Jar And Gauze
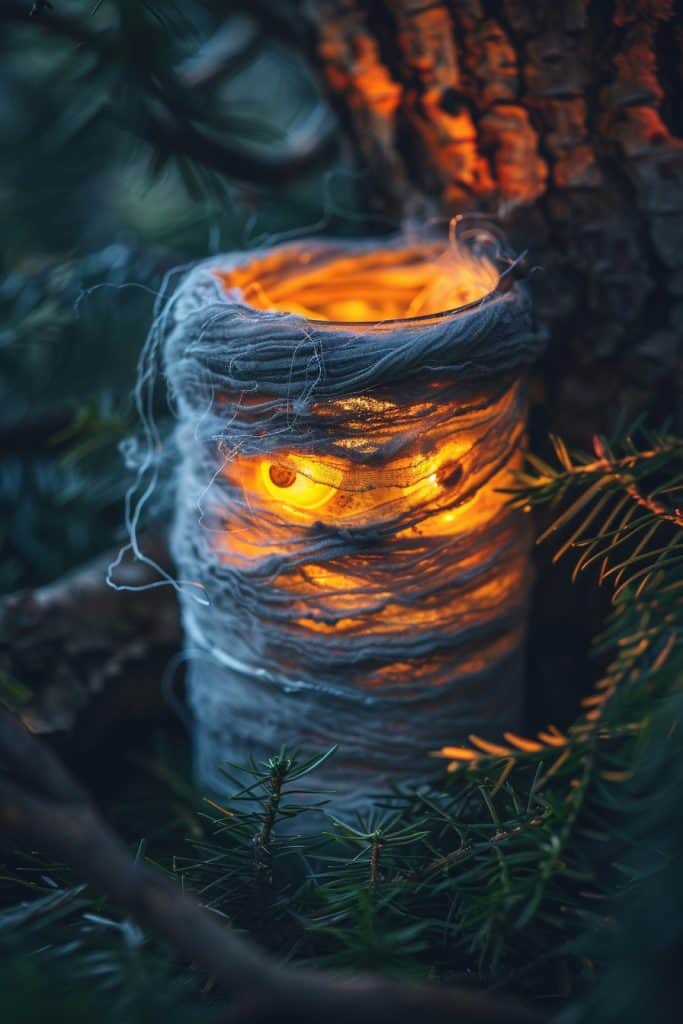
Alright, so you wanna draw this spooky-cool candle thing? First off, I’d say focus on getting that eerie glow right. The way the light’s coming through those cobweb-looking strands is super important for the whole vibe.
I actually tried something similar last Halloween – total disaster at first! But anyways, for the cobwebby part, I’d suggest using really light, feathery strokes with your pencil or whatever you’re drawing with. Don’t try to make it too perfect – the messier and more random, the better it’ll look. And make sure to leave some gaps for the light to shine through.
The pine needles in the foreground – those are tricky. I’m not 100% sure, but I think they’re probably some kind of evergreen. Maybe spruce? Eh, doesn’t really matter. Point is, you wanna get that dark, kinda spiky look to contrast with the warm glow. Oh – and speaking of glow, don’t forget to leave some white space or use a white gel pen or something for those two bright spots that look like eyes. They really make the whole thing pop in a creepy way. Reminds me of this weird jack-o-lantern I made once that ended up looking more sad than scary. But that’s a whole other story.
Last Minute Haunted Mirror

Wow, this is some next-level shadow art! The key thing that jumps out at me is how they’ve used backlighting to create this super eerie silhouette effect. It’s not just a flat shadow – you can see all these intricate branch-like details that make it look almost alive.
I tried something kinda similar once for a Halloween party decoration, but mine was way more basic. Just cut out a spooky shape from black paper and stuck it on a lamp. This takes it to a whole other level with the depth and texture. From what I can tell, they probably used a combination of real plants and maybe some wire or string to get those delicate tendrils. The framing is a nice touch too – makes it feel like you’re peeking through a window at some kinda forest spirit or something.
You know what this reminds me of? Those old-timey silhouette portraits people used to do. Except way creepier (in a good way). I wonder if you could adapt this technique for less spooky subjects… like maybe a funky plant shadowbox or something? Anyway, if you wanted to try this yourself, I’d say start with a strong light source behind a frosted screen, then experiment with layering different materials in front to get interesting shadows. Just be careful not to burn yourself on the light! I may or may not be speaking from experience there… (Ow.)
Creepy Crawly Jar
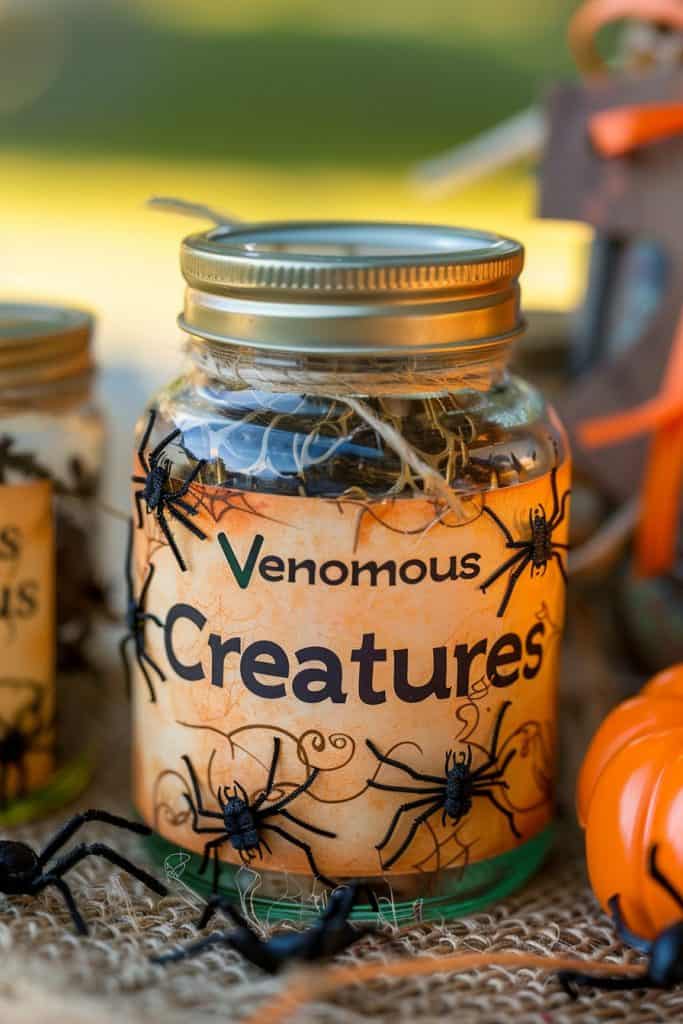
Wow, this “Venomous Creatures” jar is so cool! The artist really nailed the spooky Halloween vibe. From what I can see, they created depth mainly through layering. Those plastic spiders aren’t just stuck on flat – some are on the outside of the jar, some look like they’re inside, and there’s even webbing draped over the top. It’s like a little creepy-crawly diorama.
Honestly, I’m a sucker for these kinds of themed mason jar crafts. I did something similar last year with a “Potion Ingredients” jar, but I gotta admit, this one’s way better. The orange background really makes those black spiders pop. And that label! It looks aged and kinda wrinkled, which adds so much character. I wonder if they used coffee to stain it? That’s my go-to trick for making paper look old.
But here’s the thing – what really, really sells it is the attention to detail. Like, look at how they’ve got different sizes of spiders. And is that… yep, there’s even a bit of Spanish moss or something poking out the top. Honestly though, I’m not 100% sure what that stringy stuff is. Maybe just pulled-apart cotton balls? Either way, it’s genius. Adds a whole other layer of creepy texture. Man, now I wanna make one of these myself. Might have to hit up the dollar store for supplies this weekend!
DIY Candelabra
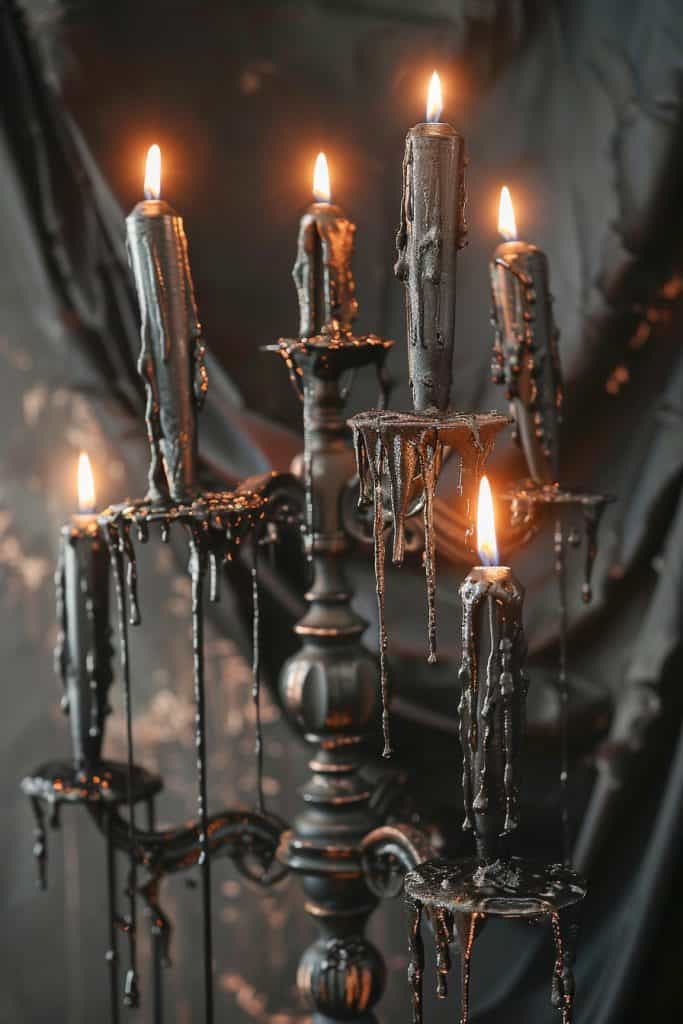
Alright, so you wanna capture those spooky candle proportions, huh? First thing I’d say is to really focus on the varying heights and widths of the candles and candlesticks. They’re all over the place, which is what makes it look so cool and eerie.
I’d suggest starting with some quick gesture sketches – y’know, just loose lines to get the overall feel. Don’t worry about details yet. Then maybe pick one candle to really zero in on. Measure it against the others using your pencil as a guide. How many “pencil lengths” tall is it compared to the shortest one? That’ll help you nail those relationships.
Oh man, this reminds me of when I tried to make some “haunted” candles for Halloween last year. Total disaster at first – I kept making them all the same height like some kinda candle factory reject, lol. Def took some practice to get that organic, dripping look.
Speaking of drips, those wax drips are key for the proportions too. They really elongate some of the candles. Maybe try sketching just the drip shapes first? Like, imagine the candles are invisible and you’re only drawing melted wax floating in space. Sounds weird but it might help you see the overall composition better.
Anyway, hope that gives you some ideas to play with! Let me know if you want any other tips – I’m just flipping through my old sketchbooks now for inspo and there’s prob more stuff in here that could help.
Empty Milk Jug Ghost
Wow, this is such a cool Halloween DIY! The glowing skull bottle is definitely the star of the show here. The way they’ve used string lights inside that white bottle to create an eerie glow is really clever. I’ve done something similar with wine bottles before, but I love how they’ve taken it to the next level by adding that spooky face decal.
The composition is really well thought out. You’ve got the skull bottle right in the center, drawing your eye immediately. Then those pumpkins on either side kinda frame it nicely. I’m diggin’ the mix of orange and white pumpkins – adds some nice contrast. Honestly though, I’m not totally sure if those are real pumpkins or fake ones. Either way, they look great.
Anyways, back to that bottle… The black face design really pops against the white glow. I’d guess they probably used vinyl for that, but you could probably achieve a similar look with paint if you wanted. Oh! That reminds me of this time I tried to paint a glass bottle and totally messed it up – the paint just wouldn’t stick right. Learned my lesson there, haha. For this project, I’d definitely recommend using adhesive vinyl if you’re gonna try it yourself. Much easier to work with, especially for those delicate details in the mouth area.
Glowing Ghost
Whoa, this is a super cool ghost setup! I’m digging the eerie vibe. Honestly, I’ve never seen a DIY ghost quite like this before – it’s pretty next-level.
So, to put a creative spin on this, I’d say go for a nature-inspired ghost. Instead of the white fabric, use layers of leaves, twigs, and moss to create a forest spirit kinda thing. You could prob use a wire frame as the base and attach the natural materials with hot glue. The glowing eyes are def a keeper though – maybe use small LED lights hidden behind some bark or a knot in the wood?
I tried something similar last Halloween, but mine ended up looking more like a compost pile than a spirit, lol. The key is getting the right balance of materials and keeping the overall shape. Oh, and make sure to use dried leaves unless you want a moldy mess after a few days. Honestly though, working with natural materials is always a bit unpredictable, which is part of the fun.
For the lighting, you could experiment with different colors. Like, what if instead of that warm glow, you used a cool blue or green? Might give it more of an otherworldly feel. Or hey, go wild and use color-changing LEDs so it shifts throughout the night. That’d be pretty rad.
Giant DIY Spider
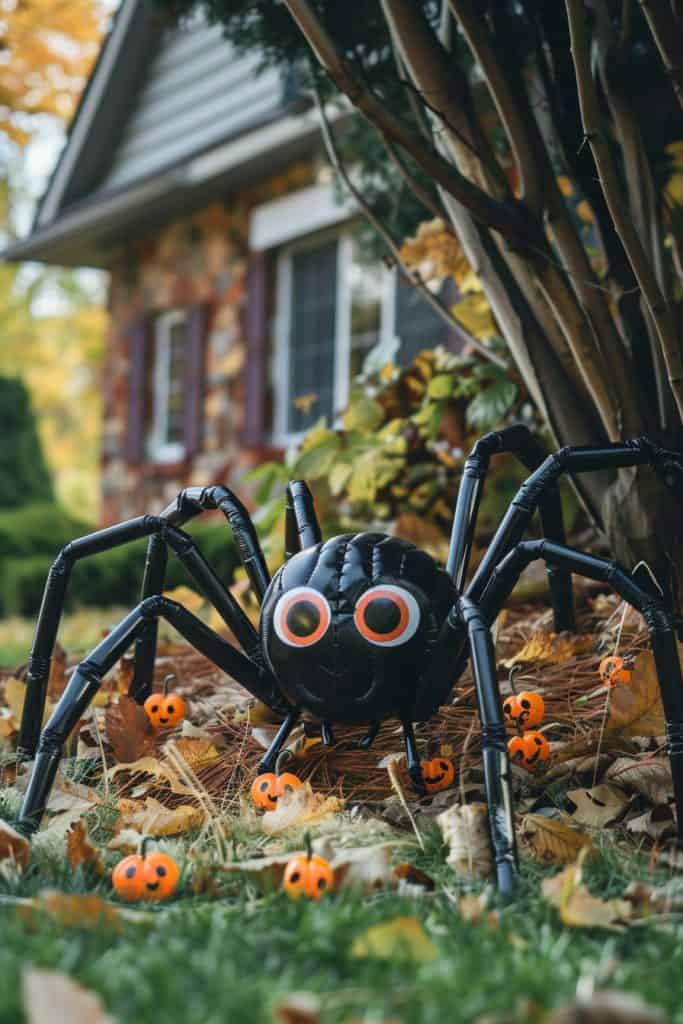
Okay, so this giant spider decoration is super cool, but let’s think about how we could apply this style to something totally different. The key things here are the oversized, cartoonish look and the use of simple shapes to create a recognizable character.
You could def take this same approach and make, like, a giant ladybug for a garden party or a huge friendly monster for a kid’s room. The body is basically just a big black sphere with some details added on. I tried making an oversized bumblebee once using a similar technique – it came out pretty cute, though the wings were a pain to get right.
For materials, looks like they used some kinda inflatable ball or foam sphere for the body, and then those bendy foam pipe insulation tubes for the legs. Super smart choice – they’re cheap and easy to work with. You’d wanna spray paint everything to get that matte black finish. The eyes are prob just orange paper or felt glued on. Oh, and don’t forget all those little pumpkins scattered around – they really sell the whole Halloween vibe. Could swap those out for flowers or something else depending on your theme.
What’s cool about this style is how it kinda straddles the line between scary and cute, ya know? Like, spiders are usually creepy, but this guy’s almost adorable. I bet you could apply that same idea to all sorts of stuff. Imagine a giant friendly shark for a beach party or a massive cuddly cactus for a desert-themed thing. The possibilities are kinda endless, though you’d need to think carefully about how to translate different features into simple shapes. Anyway, it’s a fun technique to play around with. Lemme know if you wanna bounce any specific ideas off me!
Floating Balloon Ghost
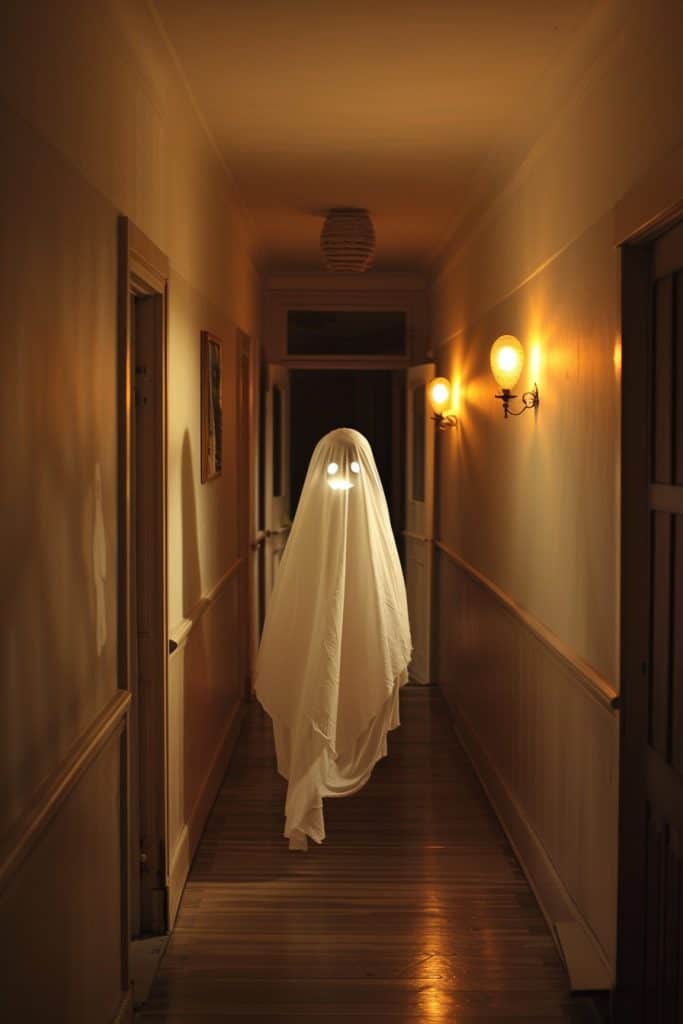
Okay, so this isn’t exactly a DIY project in the traditional sense, but it’s def got a spooky Halloween vibe that could inspire some cool crafts. I’m not gonna lie, when I first saw this, it gave me chills! The mood is super eerie and atmospheric.
The key element here is obvs the ghost figure in the hallway. It’s just a simple white sheet, but the way it’s draped and lit makes it look really creepy. If you wanted to recreate this effect, you’d need to get the lighting just right. Those wall sconces are casting this warm glow that contrasts with the stark white of the ghost. I tried something similar once for a Halloween party, but I used string lights under the sheet to make it glow from within. Didn’t quite nail teh spooky vibe like this though.
The hallway itself adds to the creepy factor too. It’s all wooden floors and paneling, kinda reminds me of an old Victorian house. Oh man, that reminds me of the time I helped renovate my aunt’s creaky old farmhouse – talk about prime ghost territory! Anyway, if you were going for this look, you could use some faux wood paneling or even just paint techniques to get that aged wood effect. The narrow space and low lighting really amp up the tension. I wonder if they used any kinda filter or post-processing to get that warm, vintage-y tone? Either way, it’s a stellar example of how lighting and setting can create a super effective spooky scene without needing a ton of props or fx.
Hanging Witch Hat
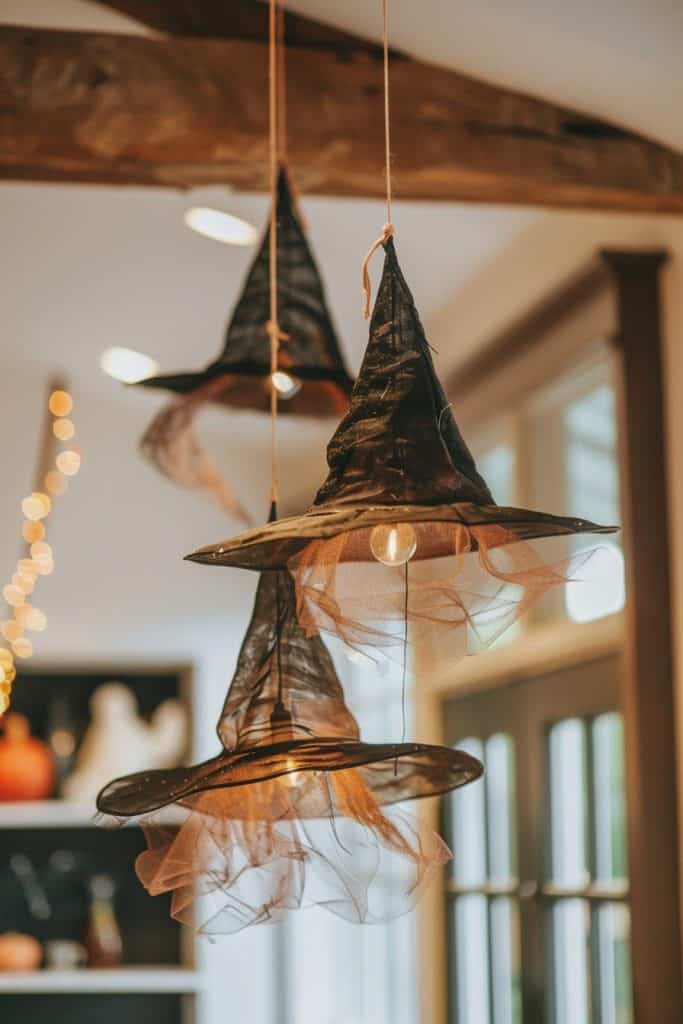
So, those witch hat lights are pretty darn cool! I’m actually kinda obsessed with how they managed to get that floaty, ethereal look. You know what might work to recreate this? Fishing line and fabric stiffener. No joke.
I tried something similar last Halloween – wanted to make ghostly apparitions floating around my porch. Total disaster at first. But then I stumbled on this technique where you soak cheesecloth in fabric stiffener and drape it over balloons. Once it dries, you pop the balloons and bam! Translucent, shaped fabric that holds its form. I bet you could do the same thing here, maybe using a regular lamp shade as your form instead of a balloon.
The hats themselves, though… that’s trickier. You could probably use some kinda wire frame to get the shape right. Or – wild idea – what about those cheap plastic witch hats you see everywhere around Halloween? Cut the bottom out, cover ’em in mod podge and black tissue paper. Layer it up real good and you might get that wrinkly, textured look. Might take some trial and error to get it just right. But honestly, half the fun of DIY is figuring out how to MacGyver stuff together, am I right? Just don’t get so caught up experimenting that you forget to actually finish the project. Not that I’ve ever done that. Nope. Definitely not.
Eyeball Made From Ping Pong Balls

Hmm, I’m not sure this is actually a drawing we’re looking at here. This seems to be a spooky Halloween decoration with some creepy eyeball ornaments! Those things are giving me the heebie-jeebies, not gonna lie.
Anyways, what’s cool about this setup is how they’ve used the gaps between the stair railings to create depth and intrigue. The dark spaces between the rails sorta frame those eyeball things and make ’em pop. It’s a clever way to use the existing architecture as part of the decor. I tried something similar last Halloween, but I used fake spider webs instead – didn’t turn out nearly as good as this.
The lighting is key here too. See how they’ve got those little fairy lights woven in? That soft glow creates shadows and highlights teh eyeballs in a really eerie way. It’s giving me ideas for my own decorations this year. Maybe I’ll grab some of those ping pong ball eyeballs from the craft store and rig up some lights… though knowing me, I’d probably get tangled up in the wires and end up looking like a mummy myself! Ah well, half the fun is in the trying, right?
DIY Witch Broomstick
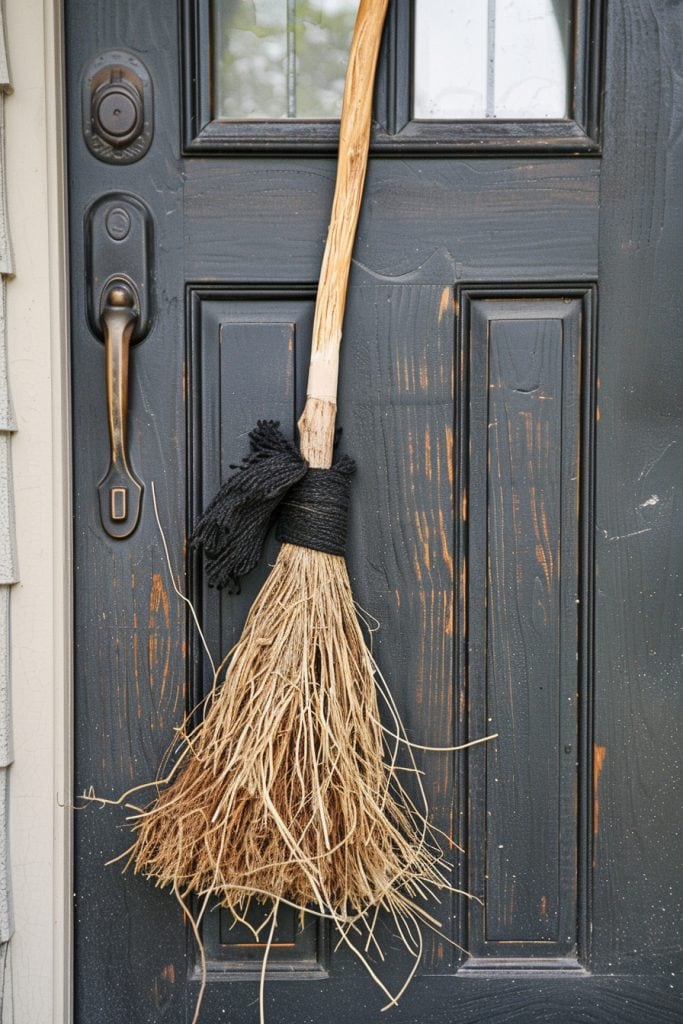
So, I gotta say, this isn’t exactly what I was expecting when you mentioned a drawing! But hey, sometimes the best DIY projects come from unexpected places, right? What we’re looking at here is actually a pretty cool broom hanging on a door. And let me tell you, there’s a lot more going on here than meets the eye.
First off, check out that broom handle. It’s not your run-of-the-mill plastic stick – looks like it might be hand-carved wood. I tried making one of those once… total disaster. Ended up with more splinters than a lumber yard. But this one? Smooth as butter. The way it’s tied to the bristles with what looks like some kinda black twine or rope – that’s a nice touch. Adds a bit of rustic charm without going overboard.
Now, about those bristles. They’re not the typical synthetic stuff you’d get at the store. Nah, this looks like real straw or maybe even sorghum. I’ve seen folks use all kinds of materials for broom bristles – corn husks, palm fronds, you name it. From what I’ve seen, natural bristles like these are great for sweeping up fine dust, but they can be a pain to maintain. Wonder how often they need to replace ’em?
Oh, and did you notice how it’s just casually hanging there on the door? That’s actually pretty clever. Makes me think – could be a cool way to display other handmade items too. Maybe a wreath or… I dunno, a macrame wall hanging? I’m getting off track. Anyways, the way it’s positioned against that weathered door really makes the whole thing pop. Speaking of which, that door’s seen better days, huh? But in a good way! Adds character.
DIY Witch Cauldron
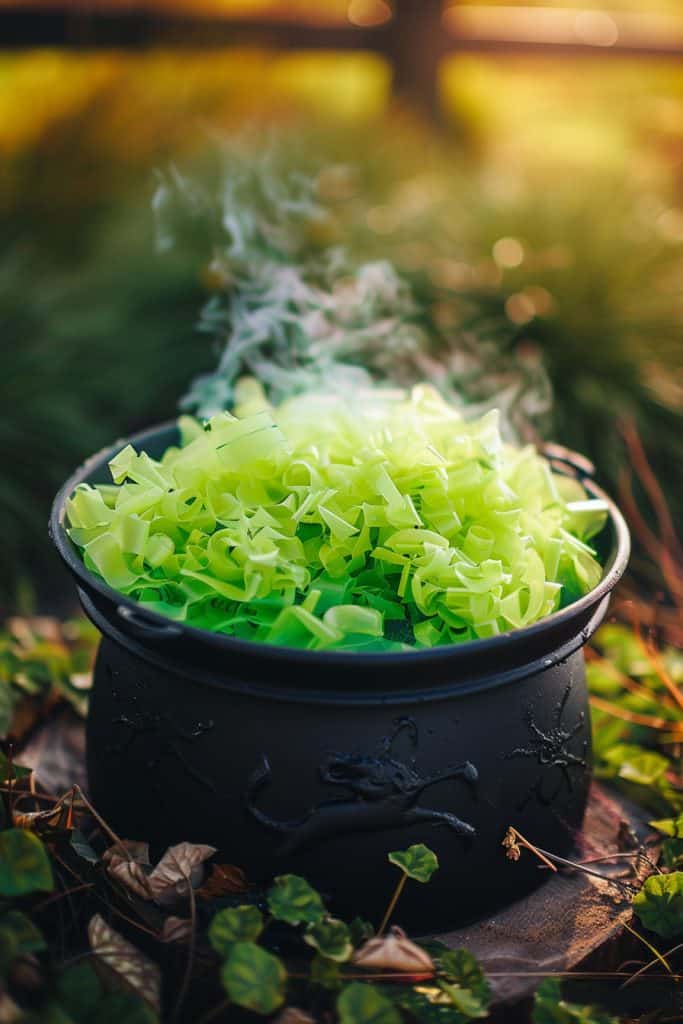
So, looking at this image, I’m not actually seeing a drawing here – it’s a photo of what looks like a cauldron filled with some kinda glowing green stuff. Super cool Halloween vibe going on! If this was a drawing though, I’d suggest adding texture by using stippling or cross-hatching techniques to give that cauldron a rough, cast-iron feel.
The photo itself is pretty darn atmospheric already. Love how they’ve got that eerie green glow coming from inside the cauldron – reminds me of this haunted house setup I did a few years back where we used glow sticks in fog machines. Anyways, to amp up the texture in a photo like this, you could try scattering some dried leaves or twigs around the base. Or maybe – and this is a bit out there – sprinkle some glitter on top of whatever that green stuff is to give it a magical shimmer?
Speaking of that green stuff, I can’t quite figure out what it is. Looks almost like shredded paper or maybe some kind of weird pasta? Whatever it is, it’s working great for the witchy potion vibe. Oh! You could also try adding some fake cobwebs draped over the cauldron edges for extra spooky texture. I’ve got a workshop coming up on Halloween props actually – might have to use this pic as inspo!
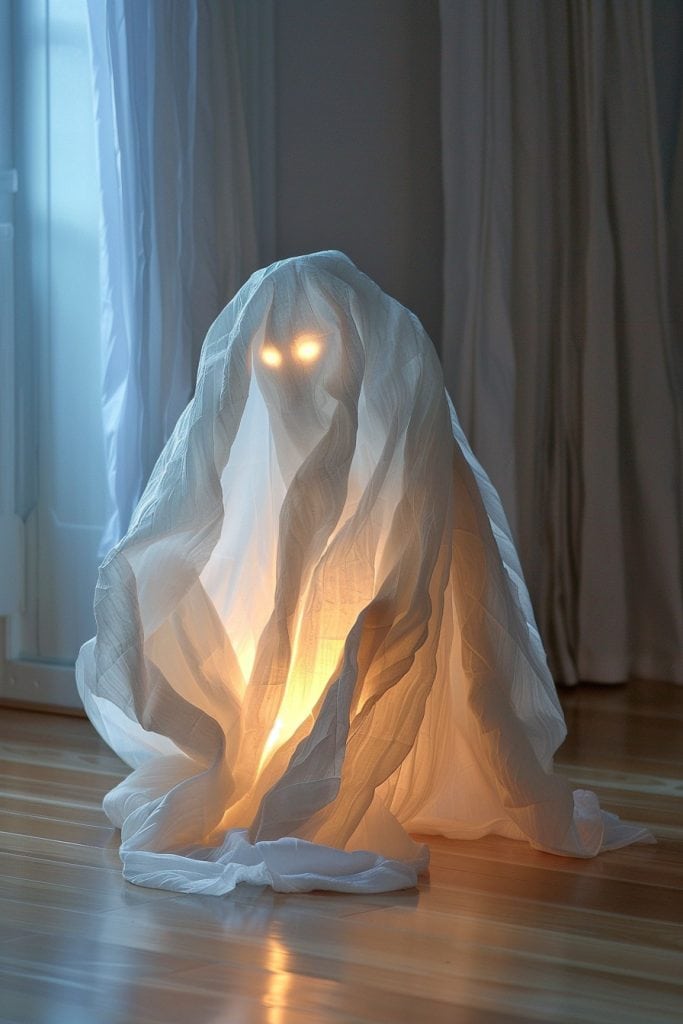
Ghost Made From Cheesecloth
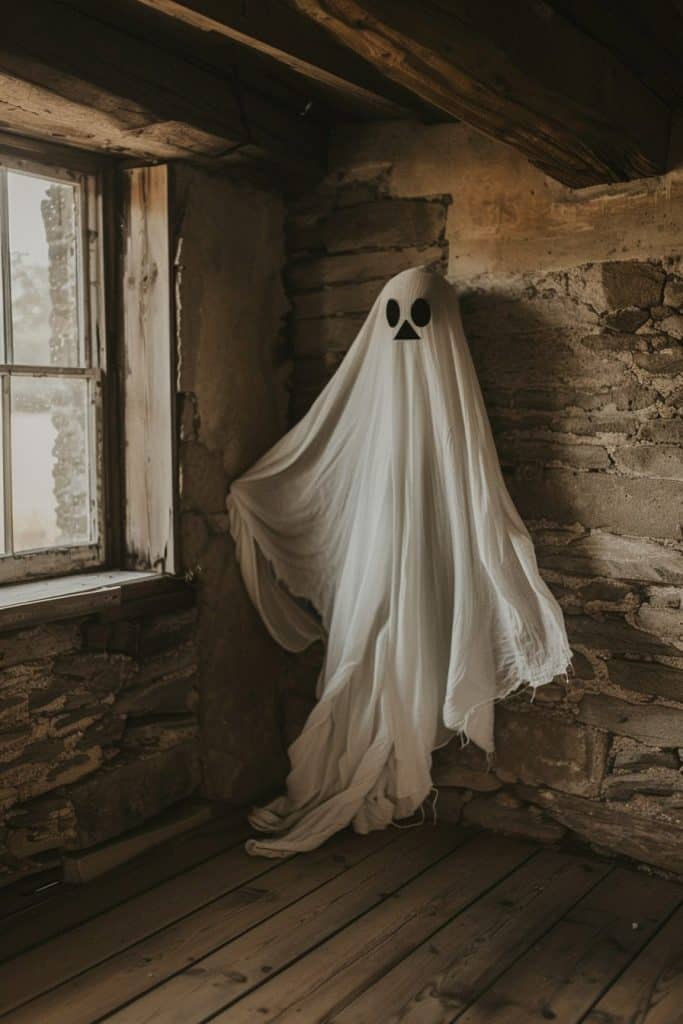
Oh man, this is a cool ghost setup! I actually just did something similar for Halloween, but mine was nowhere near this good. The perspective here really makes it work – having the ghost tucked into that corner of the old room gives it such a spooky vibe.
To change up the impact, I’d say play around with where you position teh ghost. Maybe have it floating more towards the center of the room, or even peeking out the window? That could be pretty creepy. The lighting is key too – right now it’s got this kinda moody, shadowy look which is great. But you could try backlighting it or using a single spotlight for a different effect.
The construction looks pretty simple, just a white sheet over… something? Can’t quite tell what’s underneath. Probably a frame or mannequin. The eyes are a nice touch – look like they might be cut out and backed with black fabric? From what I’ve seen, using battery-operated LEDs behind the eyes can add an extra creepy glow. Oh, and the ragged edges at the bottom are *chef’s kiss* – gives it that floaty, ethereal look.
You know, this reminds me of the time I tried to make a ghost for my front porch and it ended up looking more like a sad marshmallow. Craft fails, am I right? Anyway, I think the key to making this work is…wait, no, scratch that. There’s no one key. It’s all about experimenting and finding what works for your space. Maybe try different fabrics or even project some eerie patterns onto it? The possibilities are pretty endless when you start playing around with
Spider Web
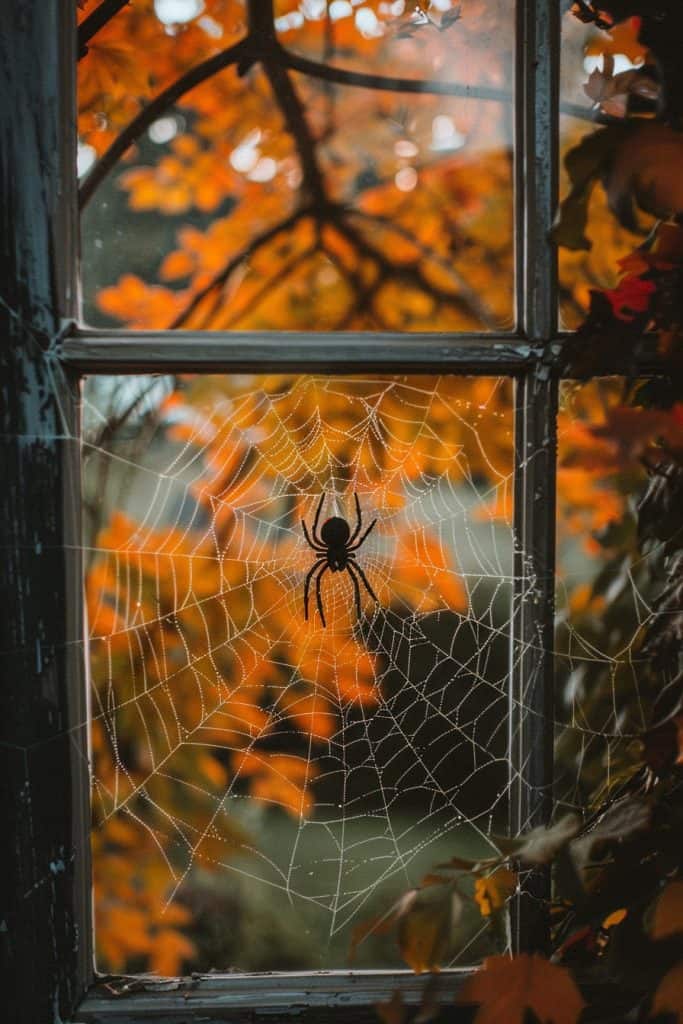
So, this image is just killer when it comes to contrast! The artist really nailed it with that spiderweb against the fall foliage. I’m not gonna lie, I’m a sucker for anything autumn-themed, and this takes it to a whole new level.
The contrast here is working on multiple levels. First, you’ve got the dark, intricate lines of the web against that gorgeous orange backdrop. It’s like nature’s own Halloween decoration! The way the web catches the light makes it stand out even more. Then there’s the contrast between the delicate, lacy web and those chunky tree branches in the background. It’s giving me ideas for my own fall crafts… maybe I could try recreating this with some black thread on an orange canvas? Oooh, or what if you used glow-in-the-dark paint for the web?
I really, really love how they framed this shot through the window panes. It adds another layer of contrast – the rigid geometric shapes of the window versus the organic curves of the web and leaves. Speaking of the window, I wonder if they cleaned it first or if that slight grunginess is intentional? Either way, it works! It reminds me of this time I tried to do a similar project but forgot to wipe down my windows first. Let’s just say it didn’t turn out quite as Instagram-worthy as this one!!! But hey, live and learn, right?
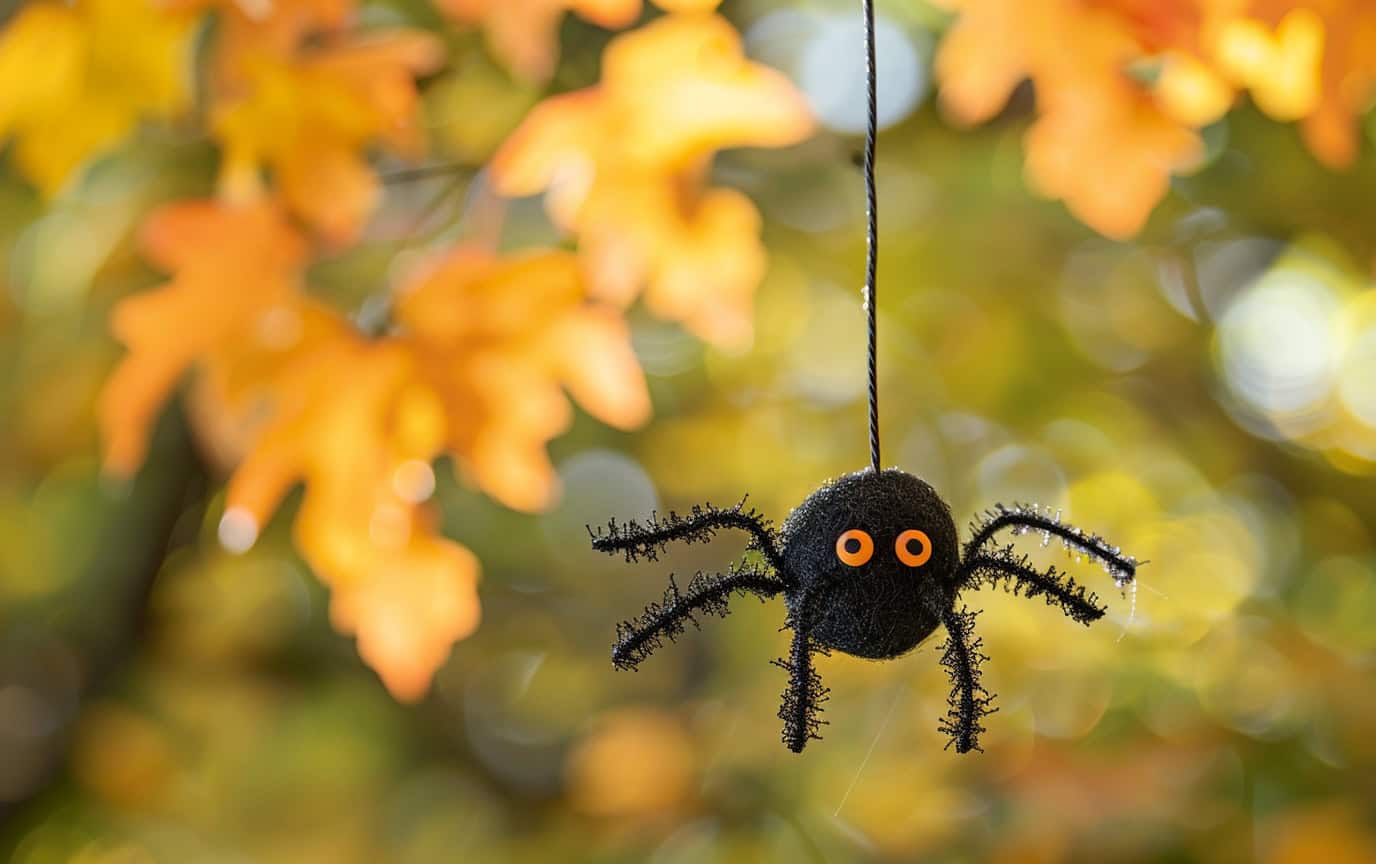
DIY Hanging Spider
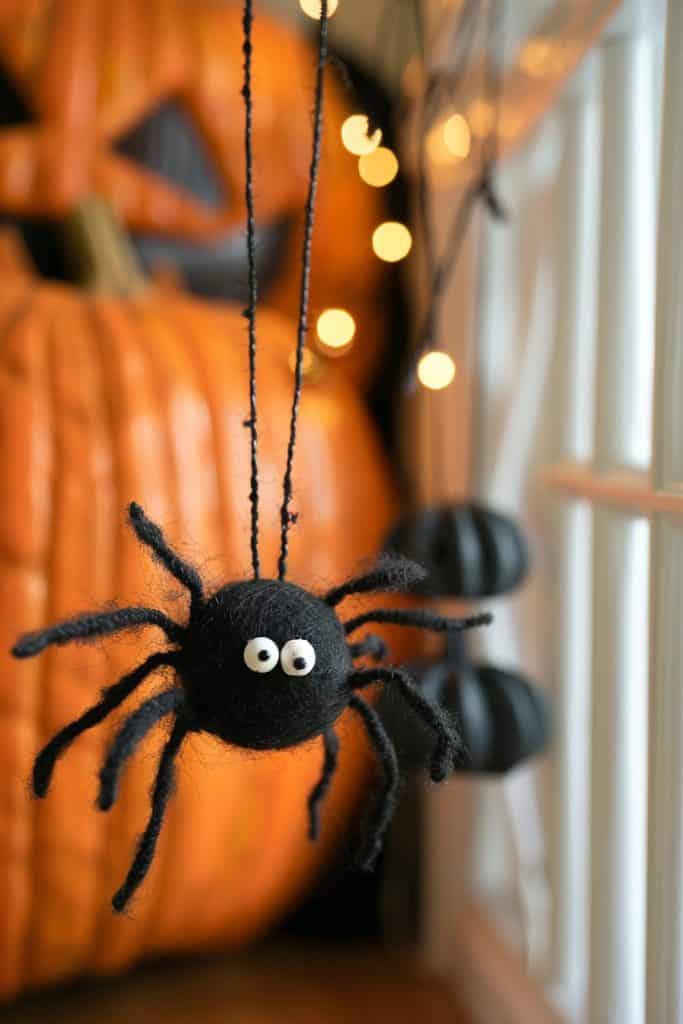
Oh man, this little spider decoration is adorable! I love how they used what looks like needle felting to create that fuzzy texture – it really brings the spider to life. To make it even more dynamic, I’d suggest adding some subtle movement. You could try attaching the spider to a thin, nearly invisible fishing line and hanging it from a small motor or even a battery-operated fan. That way, it would gently sway and bob, like it’s actually crawling down from the ceiling. I did something similar for a Halloween party once and it freaked people out in the best way!
Anyways, the googly eyes are a nice touch too – they give it that cartoony, non-threatening vibe. From what I’ve seen, you can find those at pretty much any craft store. The pumpkin in the background adds great context, and those twinkly lights really set the mood. I’m not totally sure, but it looks like they might be using some kind of bokeh effect with the camera to make the lights all soft and blurry. It’s a neat photography trick that really enhances the spooky-but-cute atmosphere.
Oh! Speaking of atmosphere, you could also play around with different colored lights to change up the mood. Like, imagine if those warm yellow lights in the background were swapped out for eerie green or purple ones. It would completely transform the vibe of the whole scene. I’m actually planning on covering lighting techniques in an upcoming art workshop I’m teaching – it’s crazy how much impact a simple change of lighting can have on a project. But yeah, back to the spider – adding some subtle movement would definitely take this from a static decoration to an eye-catching centerpiece that people can’t help but notice.
Eyeball Wreath
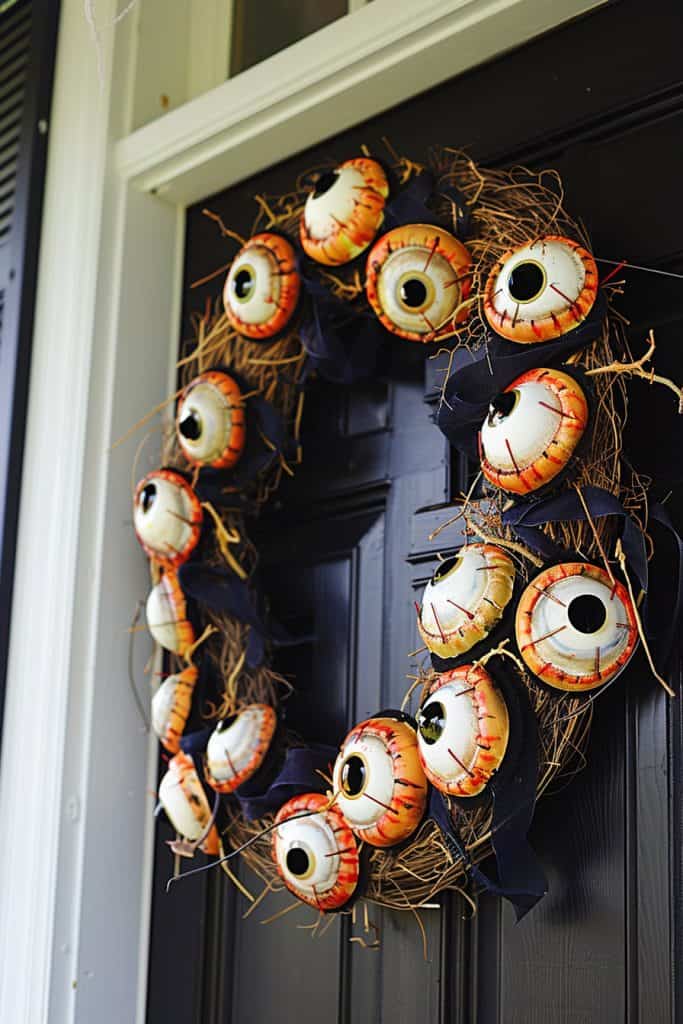
Whoa, this eyeball wreath is super creepy-cool! I’m diggin’ the Halloween vibe. So to adapt this into a different medium… hmm. You could def turn this into a painting or illustration pretty easily. Just sketch out the wreath shape, then go to town adding all those gnarly eyeballs. Acrylic paint would work great to get those vivid oranges and reds.
Or hey, what about a 3D version using clay? That’d be sick. You could sculpt each eyeball individually, maybe using polymer clay. Paint ’em up all bloodshot, then attach ’em to a foam wreath base. Prob want to use a strong adhesive for that. I tried making clay ornaments last year and lemme tell you, getting them to stick was a pain in the butt.
Y’know, this is reminding me of this wild installation I saw at an art gallery once. It was this whole room covered in creepy doll parts – arms, legs, heads, the works. Kinda gave me the heebie-jeebies, but in a good way? Anyway, you could take inspiration from that and go big – make a whole eyeball wall! Although I guess that might freak out your neighbors. Maybe save that one for a haunted house setup.
Oh, and those straw-like bits between the eyes… are those supposed to be, like, optic nerves or something? From what I can see, they add a lot of texture. You could recreate that effect with yarn or twine in a different project. Or even go abstract with it – do a minimalist version with just circles and squiggly lines. Art’s all about interpretation, right?
Potion Shelf
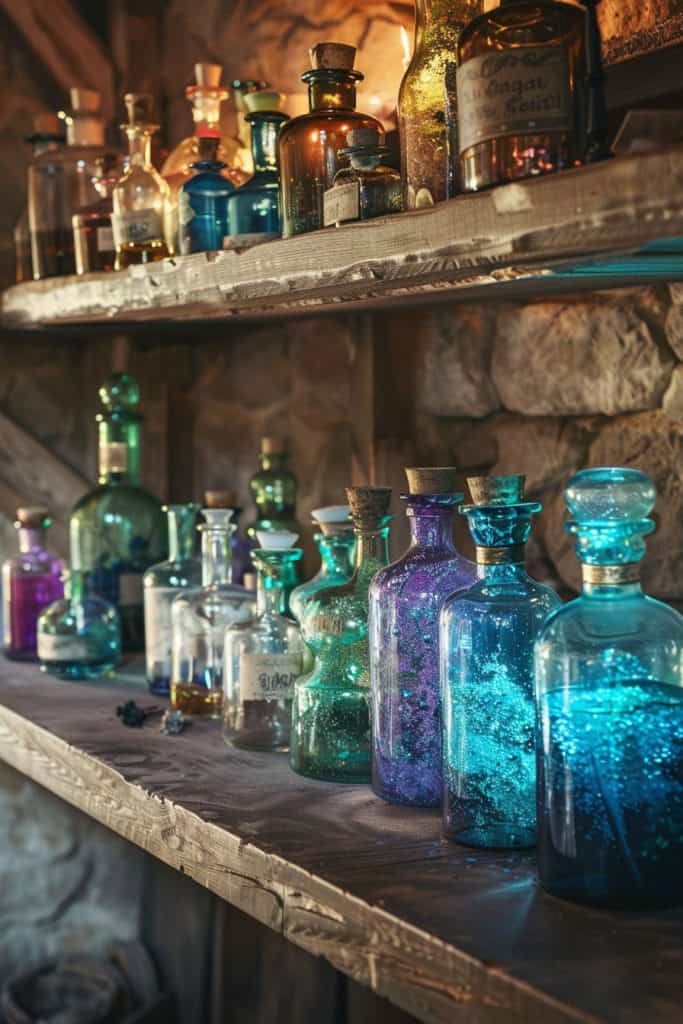
So, looking at this image, the first thing that jumps out is the repetition of those gorgeous glass bottles. The artist has created this amazing rhythm with all these different shapes and sizes, but they’re unified by the material. It’s giving me major apothecary vibes, you know?
Honestly, the color palette is what’s really tying it all together. Those blues and teals are just *chef’s kiss*. I tried something similar once with some old bottles I found at a flea market, but mine didn’t turn out nearly this cohesive. I think the key was… wait, no, scratch that. I shouldn’t say there’s a “key” – that’s too cliche. What I mean is, the artist here clearly put a lot of thought into how to arrange everything.
The way they’ve stacked the shelves is pretty clever too. You’ve got the smaller, more delicate bottles on the bottom shelf, and then the chunkier, more substantial ones up top. It creates this nice visual weight that draws your eye up. Though I gotta say, I’m a little nervous about how stable that top shelf looks. Maybe it’s just the angle of the photo, but I’d be worried about knocking something over if I was dusting up there.
Oh, and can we talk about whatever that sparkly stuff is inside some of the bottles? It’s like… fairy dust or something. I wonder if it’s just glitter, or if they used some kind of special craft material. Honestly though, it adds this whole extra layer of magic to the setup. Makes me wanna try something similar in my own place, even though I know I’d probably end up with glitter all over my floor for months. Worth it though, right?
With these 20 quick and simple DIY Halloween props, you’ll have everything you need to set the scene for a hauntingly good time! Perfect for those last-minute moments, these easy-to-make decorations bring just the right amount of Halloween spirit to your home. So grab your crafting supplies, and let your creativity shine as you add a spooky twist to your decor. Here’s to a festive and frightfully fun Halloween!