Get ready to elevate your spooky style with these 25 Halloween nail art ideas for the perfect mani! Whether you’re heading to a costume party or just want to embrace the Halloween spirit, these nail designs are sure to add a hauntingly fun touch to your look. From classic pumpkins and ghosts to stylish spider webs and black cats, there’s a variety of easy and creative designs for every level of skill. Grab your nail polish, brushes, and a little Halloween inspiration, and get ready to give your nails a festive makeover!
All photos provided are original and can be used as a reference for your own nail art.
Table of Contents
Whimsical Monsters
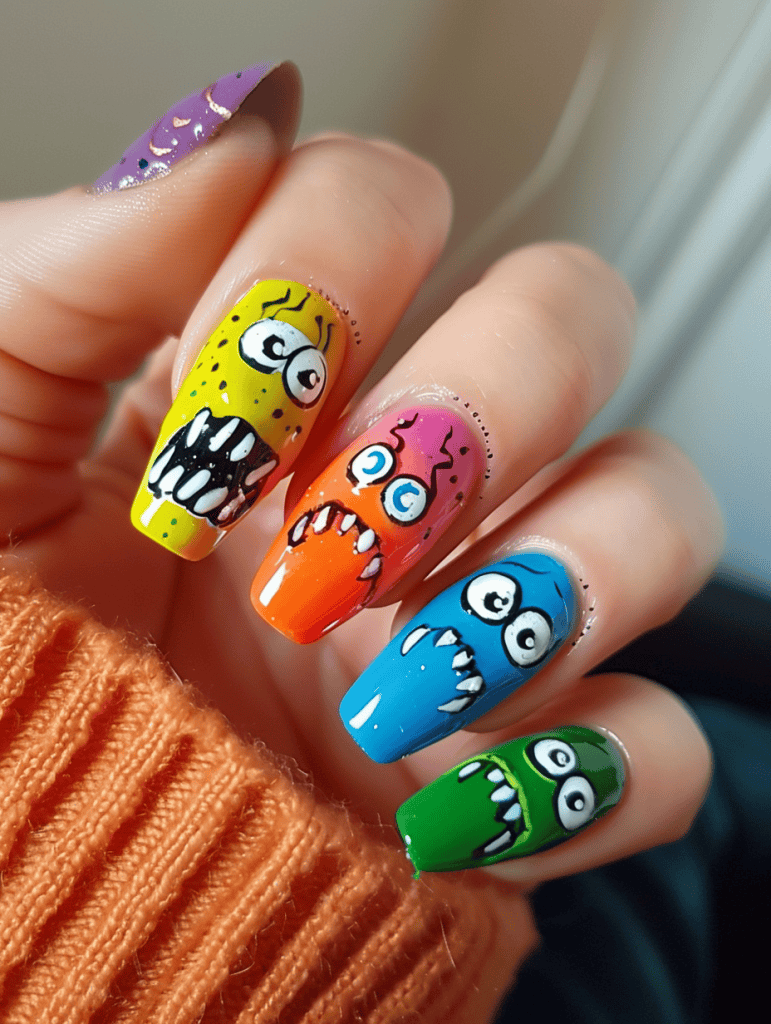
Wow, those nails are wild! The bright, vibrant colors immediately grab your attention and create an energetic, playful mood. Each nail features a quirky monster face with exaggerated expressions – big eyes, sharp teeth, and goofy grins. It’s like a cartoon come to life on fingertips.
The artist achieves this fun vibe through bold color choices and simple yet expressive designs. The contrasting eyes and teeth really make each face pop. I love how they’ve used different base colors for variety, while keeping a consistent style across all the nails. The glossy finish adds an extra punch of vibrancy too. This nail art definitely showcases creativity and a sense of humor – it would be a great conversation starter!
Pumpkin Patch
Those pumpkin nails are seriously impressive! To recreate that intricate autumn design, you might try an unexpected tool like a toothpick dipped in nail polish. The fine point would let you get those delicate leaf details and pumpkin ridges.
For the sparkly background, you could experiment with dabbing on glitter polish using a small makeup sponge. It would give that scattered shimmer effect without fully covering the base color. And here’s a wild idea – try using real pressed leaves as stencils for the green accents. Press a tiny leaf onto the wet polish, then peel it off for a natural shape and texture.
Vintage Halloween
This nail art is a masterclass in using negative space effectively. The artist has cleverly left portions of the nail unpainted, allowing the natural nail color to become part of the design. It’s particularly striking on the nails featuring the silhouette scenes – the pale background acts as a canvas for the dark, intricate imagery.
The contrast between the painted and unpainted areas creates depth and dimensionality. On the nail with the orange-tinted landscape, the negative space forms the moon, while bats and trees are rendered in black. This layering effect is quite advanced. I’d suggest practicing simpler negative space designs first, maybe starting with basic geometric shapes or single silhouettes against a bare nail. Once you’ve got the hang of that, you can build up to more complex scenes like these.
Minimalist Ghost
This isn’t actually a drawing – it’s a photograph of some very detailed nail art. The artist has created an intricate design on silver metallic nail polish. What stands out is the precise placement of tiny black dots and crosses on each nail. They’ve managed to keep the pattern consistent across all visible nails, which takes a steady hand and good eye.
The background adds a nice seasonal touch. Those blurred autumn colors really make the silver polish pop. It’s clever how they’ve incorporated the knit sleeve into the shot too – gives it a cozy fall vibe that complements the nail design.
I’m impressed by how clean the edges are around the cuticles. That’s often tricky to get right, especially with metallic polishes. The oval shape of the nails is uniform as well, which creates a polished look. Overall, it’s a great example of how small details can elevate a manicure from basic to eye-catching.
Spiders And Web
Oh wow, those Halloween-themed nails are so eye-catching! The orange and black color scheme with the spiderweb and spider designs really nails the spooky vibe.
For adding more texture, you could try using a fine-tipped brush to create raised 3D elements. Imagine painting delicate spider silk strands coming off the webs, or adding tiny bumps to mimic the texture of a pumpkin’s skin on the orange parts. That would give it an extra tactile dimension.
Another cool idea would be incorporating some metallic foil or glitter in strategic spots. A hint of silver or gold could make the web designs pop even more, or you could dust some orange glitter over the black tips for a starry night effect. Just be careful not to overdo it – sometimes less is more with texture accents.
Spooky Black Cat
This nail art design is striking! The black base with glittery accents creates a cosmic vibe, while the green cat eyes and crescent moons add an eerie, supernatural element.
From a drawing perspective, shifting the angle could really enhance the drama. Imagine capturing this from above, looking down at splayed fingers – it would create an expansive galaxy effect. Or try an extreme close-up on just one nail, letting those intricate details fill the frame. That would let you play with scale, making those tiny moons and eyes seem massive and imposing.
Another cool approach might be to zoom out and include more of the hand or even full arms. You could continue the space theme, painting nebulas and stars trailing up the skin. That would give context to the nails and create a more immersive piece overall. Whatever angle you choose, focus on nailing those fine details – the sparkle in the polish, the shine on the cat eyes. Those little touches are what make nail art so mesmerizing.
Spider Webs In Metallic Gold
The contrast in this nail art is striking and effective. The deep, glossy black base creates a perfect canvas for the shimmering gold accents. It’s like looking at a starry night sky – the gold designs pop against the darkness, drawing the eye immediately.
What’s really clever is how the artist varied the contrast levels. Some nails have bold, fully gold patterns, while others incorporate more subtle gold flecks or outlines. This creates depth and keeps things interesting as you look from nail to nail. The spiderweb design is particularly eye-catching – those fine gold lines really stand out. I’d suggest practicing that kind of delicate linework if you want to recreate this look.
Shimmering Gold Skulls
Wow, those nails are seriously striking! The gold skull designs on black are already eye-catching, but we could amp up the drama even more.
To make this static image more dynamic, I’d suggest adding some motion blur effects around the edges of the hand. This would give the impression the hand is in motion, perhaps gesturing or casting a spell. It’d really play up the mystical, edgy vibe of the skull motif.
Another idea would be to incorporate some subtle sparkle or shimmer effects on the gold designs. This could create an illusion of the light catching the metallic elements as the hand moves. Even a faint smoke or mist effect swirling around the fingertips could add an extra layer of intrigue and movement to the composition. The contrast between the ethereal smoke and the sharp, defined nail art would be visually compelling.
Jack O Lantern
This nail art design is a fantastic starting point for adaptation into other mediums. The vibrant jack-o’-lantern motif could translate beautifully onto a canvas using acrylic paints. You’d want to emphasize those bold orange pumpkins against a darker background to really make them pop.
For a different take, consider woodblock printing. The clean lines of the pumpkin faces and leaves would carve nicely into a wood block. Imagine the texture you could achieve by layering different colors for the vines and pumpkins. It’d give the whole piece a rustic, handcrafted feel that fits perfectly with the autumn theme.
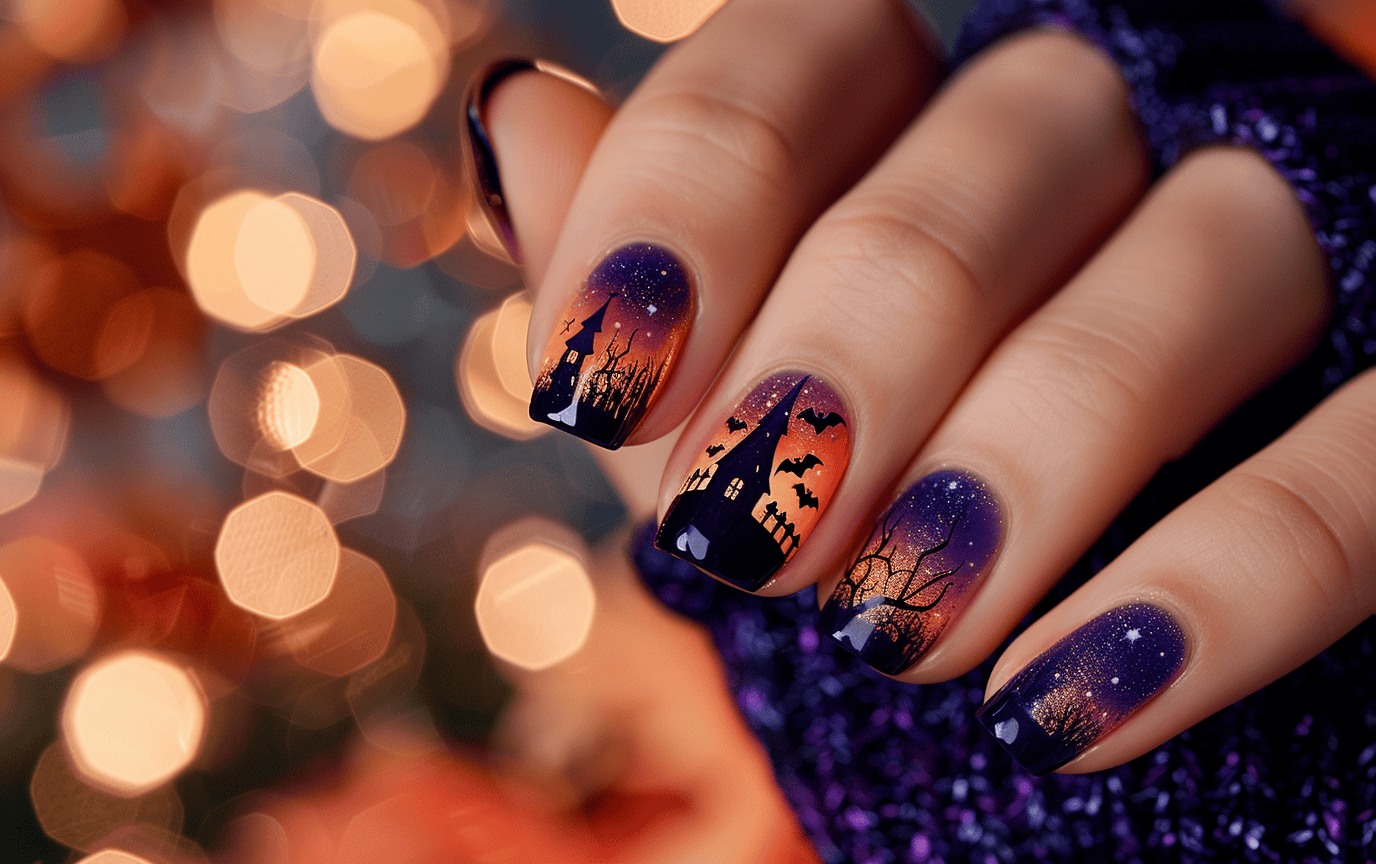
Haunted House
This nail art design is a masterclass in repetition with a Halloween twist. The artist has created a spooky silhouette scene that’s replicated across multiple nails, giving a cohesive look to the entire set. Each nail features the same basic elements – a haunted castle or house, flying bats, and an ombre background that shifts from pink to purple.
The clever use of color gradients adds depth to the repeated pattern. That pink-to-purple fade creates a twilight sky effect, making the black silhouettes really pop. It’s a smart way to add visual interest without overcomplicating the design. The slight variations in the castle shapes from nail to nail keep things from looking too uniform or mechanical. As a beginner, you could practice this technique by sketching the same simple shape multiple times, focusing on small differences each time to keep it organic.
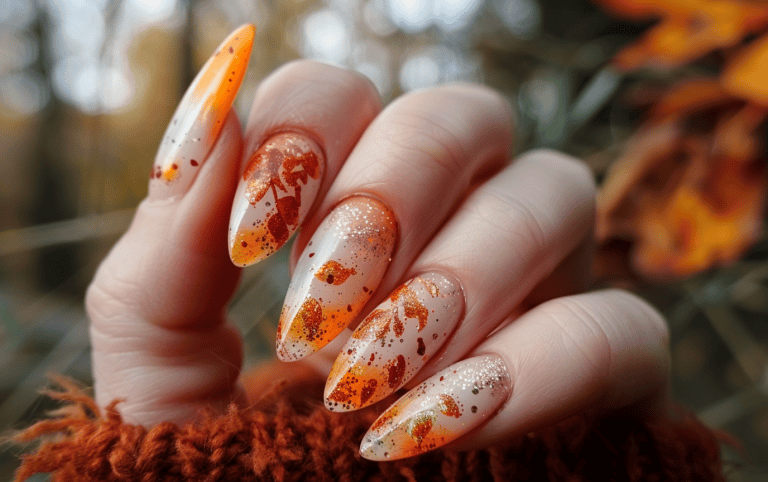
Autumn Leaves
The vibrant autumn-themed nail art immediately grabs my attention. Those warm oranges, reds, and yellows against the neutral base are striking. The detailed leaf designs and miniature nature scenes on each nail are incredibly intricate – I’m impressed by the artist’s steady hand and eye for tiny details.
Looking closer, I notice how the artist has captured different aspects of fall on each nail. There are delicate leaf veins, acorns, and even what looks like a little fox or woodland creature. The shading and dimension achieved in such a small space is remarkable. As someone who’s attempted nail art, I know firsthand how challenging it can be to work on that scale.
Glittered Galaxy
Wow, those galaxy nails are stunning! If I were sketching this, I’d start with the overall shape and gradient of the nails. Getting that transition from deep black to vibrant purple and blue is crucial for capturing the cosmic vibe.
The stars are the real showstoppers here, so I’d focus on those next. I’d probably use a fine-tipped white pen or even a bit of correction fluid to add those pinprick highlights. It’s all about placement – scattering them naturally to mimic actual constellations. The larger, more prominent stars with their crisp four-point shape really make the design pop. Don’t forget the subtle sparkle of the glitter throughout – that’s what gives it that magical, twinkling effect.
Gradient Bats
Looking at these nails, the artist really nailed an eye-catching Halloween-inspired design. The gradient blend of vibrant green and purple creates a spooky backdrop, but it’s the silhouettes that steal the show. Those little bat shapes add just the right touch of whimsy without going overboard.
What’s clever is how they’ve used fine black lines to suggest bare tree branches against a twilight sky. It gives depth and sets a moody scene on such a tiny canvas. The splatters of black dots sprinkled throughout are a smart way to add texture and visual interest. Overall, it’s a creative take on seasonal nail art that shows a lot of skill in detailed work on a small scale.
Night Sky
Wow, those celestial nails are stunning! The level of detail in that starry night sky design would definitely be tricky for a beginner to capture. Getting that gradient from deep blue to shimmering silver, plus all those tiny pinpoint stars, requires a really steady hand and lots of practice.
The crescent moons are another challenge. Their crisp, clean lines contrast beautifully with the sparkly background, but achieving that precision takes skill. A novice might struggle to keep the edges smooth and the shape consistent across multiple nails. And let’s not forget about that glitter placement – making it look random yet balanced is tougher than it seems. Overall, this manicure is a masterclass in fine motor control and patience!
Pastel Skulls
Those nails are a riot of color and design! For a beginner wanting to practice drawing elements from this image, I’d suggest starting with the skull motifs. They’re stylized and relatively simple, making them great for building confidence.
Try sketching the basic skull shape – an oval with eye sockets and a jaw. Then add the decorative elements like the floral patterns and teeth. Don’t worry about perfection; focus on capturing the playful spirit. Once you’ve got the hang of the skulls, move on to the individual flower designs. Practice drawing different petal shapes and arrangements. The daisies and cherry blossoms here would be fun to replicate.
For a challenge, experiment with color combinations inspired by the pastel base colors. You could create your own nail art designs on paper, mixing and matching elements from the photo. Remember, nail art is all about creativity, so let your imagination run wild!
Creepy Crawly
Oh wow, those nails are fantastic! The spooky Halloween design is really eye-catching. I’m particularly impressed by the gradient effect from dark to light on each nail – it creates depth and draws the eye along the length of the nails. That’s not easy to pull off, especially with such a detailed design on top.
The spider silhouettes really pop against that gradient background. Nice choice using black for maximum contrast. I like how they varied the sizes and placements of the spiders too – it keeps things visually interesting across all the nails. The crackle effect adds great texture. Overall, it’s a cohesive theme without being repetitive.
Creepy Red Eye
Wow, those nails are seriously intense! The level of detail in those eye designs is impressive. As a fellow artist, I’m blown away by the precision required to paint such realistic eyes on such a small canvas.
For enhancing this already striking design, I’d suggest adding some subtle veins or blood vessels radiating out from the eyes. That could amp up the creepy factor and make the eyes look even more lifelike. Maybe incorporate some thin red lines using a fine brush or nail art pen. It’s a small touch, but it could really take these spooky peepers to the next level.
Candy Corn
When tackling this vibrant nail art design, one pitfall to watch out for is getting too caught up in the intricate details right away. It’s tempting to dive into those mesmerizing swirls and glitter accents, but nailing the overall shape and proportions of the nails is crucial first.
Focus on capturing the elongated almond shape before anything else. Those striking yellows and oranges can be deceptive – they’ll draw your eye immediately, but resist the urge to start with color. Block out the basic nail shapes in light pencil, paying attention to how they curve and taper. Once you’ve got that foundation solid, then you can have fun bringing those sunny hues to life. Just remember, even the most dazzling nail art falls flat if the underlying structure is off.
Pumpkins And Bats
Those Halloween-themed nails are stunning! The intricate details and vibrant colors really make them pop. For beginners looking to recreate this kind of nail art, I’d say mastering fine brush control is crucial.
Practice painting thin, precise lines like the delicate spider webs and bat silhouettes. It takes a steady hand and lots of patience. Don’t get discouraged if your first attempts aren’t perfect – nail art this detailed is challenging even for pros.
Another key skill is blending colors smoothly, like the purple and gold gradient backgrounds. Try experimenting with different brush techniques and paint consistencies to achieve those seamless transitions. And have fun with it! Halloween designs are a great chance to get creative and playful with your nail art.
Deep Green And Black Polish
Those nails are stunning, but I can see how they’d be intimidating for a beginner to draw. Let’s break it down to make it more approachable.
Focus on the overall shape first – almond nails are basically elongated ovals tapering to a point. Sketch those basic shapes lightly. For the galaxy effect, you could start with a dark base and use a sponge or stippling technique to dab on lighter green areas. Don’t worry about perfect blending yet. The stars can be simplified to tiny white dots and X shapes.
For practice, I’d suggest drawing just one nail to start, maybe the middle one with the prominent stars. Get comfortable with that before tackling the whole set. And don’t stress about the intricate glitter – a few strategically placed sparkles will give the same effect when you’re learning. Remember, nail art is meant to be fun! Even simplified, this design will look magical.
Bejeweled Spider
This isn’t actually a drawing – it’s a stunning photograph of an elaborate nail art design. The level of detail is truly impressive.
One subtle element that really elevates the overall impact is the bokeh effect in the background. Those soft, out-of-focus light spots create a sense of glamour and luxury that perfectly complements the intricate nail art. It gives the image a dreamy, high-end feel without distracting from the main subject.
The spider design on the black nail is another clever touch. At first glance, you might miss it, but once noticed, it adds an edgy, unexpected element to the glittery elegance. The way the rhinestones catch the light, especially on that accent nail covered in silver glitter, creates beautiful depth and dimension. It’s a masterclass in balancing bold statement pieces with more subtle accents.
Waves And White Ghost
Wow, those ghost nails are hauntingly beautiful! For a beginner attempting to draw this, I’d suggest starting with the blue ombré background. Practice blending shades of blue to create that ethereal, watery effect. It’s easier to add the ghosts and details on top once you’ve nailed the base.
Getting those little ghosts right can be tricky. Focus on their simple shapes first – they’re basically curvy white blobs with tiny black eyes. Don’t stress about making them perfect. The charm is in their slightly wonky, hand-painted look. For the swirly designs, try using a fine-tipped brush or pen to get those delicate lines. And don’t forget the sparkle! A few well-placed dots of white or silver can really make the whole design pop.
Matte Black With Red Tips
This nail art design really pushes the envelope with its bold contrast and intricate details. The matte black base creates a striking canvas for the blood-red tips and tiny skull accents. It’s a daring choice that captures attention immediately.
What stands out to me is the clever use of negative space. Those little white skulls aren’t just painted on – they’re carved out of the black polish, creating depth and texture. The scattered red gems add sparkle without overwhelming the design. It’s edgy but still polished, if you’ll pardon the pun.
I’d encourage beginners to start with simpler elements before tackling something this complex. Maybe practice painting crisp French tips or placing tiny rhinestones first. But don’t be afraid to experiment with unconventional color combos like this black and red. That contrast is what gives this look its punch.
Assorted Halloween Candies
The vibrant colors and bold designs on these nails really pop against the rainbow backdrop! The artist creates depth through clever use of texture and layering. Check out that orange nail with the raised, caviar-like beads forming a unicorn silhouette – it practically leaps off the nail bed.
Dimensionality also comes through in the purple nail’s design. Those little raised dots in various colors give it a bubbly, 3D effect that contrasts nicely with the flat white lines. The multi-colored striped nail uses color blocking to suggest depth, while the solid pink one provides a simpler counterpoint. Overall, it’s a fun, eye-catching look that plays with texture and color to create visual interest.
Matte Orange With Spiderwebs
Those Halloween-themed nails are seriously eye-catching! To practice capturing their proportions accurately, I’d recommend starting with basic geometric shapes. The almond nail shape is essentially an elongated oval, so sketching those outlines first will give you a solid foundation.
For the intricate designs, try breaking them down into simpler components. The spiderweb, for instance, can be approached as a series of concentric curves intersected by straight lines. The spider silhouettes are mainly small ovals with radiating lines. Focus on getting these core shapes right before adding details. A helpful exercise might be to sketch just the outlines repeatedly, gradually refining your accuracy. Don’t forget to pay attention to the negative space between design elements too – it’s just as important for nailing those proportions.
With these 25 Halloween nail art ideas, you’ll have endless options to create the perfect spooky mani this season. Whether you prefer playful pumpkins or intricate spider webs, each design offers a fun way to embrace the Halloween vibe and show off your creative side. Perfect for Halloween parties or simply adding a festive touch to your everyday look, these nail art ideas will have you feeling spooky and stylish all October long. So, grab your tools and treat yourself to a fang-tastic mani this Halloween!