Halloween pottery painting ideas can be as simple as tiny ghosts and jack-o’-lantern faces or as detailed as moonlit cats, skeletons, haunted cottages, and gothic florals. Whether you’re decorating a mug, plate, bowl, trinket dish, planter, or vase, the best design starts with a motif and mood that suit the shape of your pottery.
If you are new to ceramic painting, start with these pottery painting ideas for beginners for more simple shapes, manageable palettes, and beginner-friendly patterns.
Which Halloween Pottery Painting Idea Should You Try?
Not sure where to start? Choose the look you want first, then pick a design that matches your confidence level and the piece you’re painting.
| If you want… | Start with… | Why |
|---|---|---|
| Easiest | Tiny Ghost Mug | Simple repeated shapes |
| Cute | Ghost Cat Mug | A playful twist on a familiar Halloween motif |
| Classic | Witch-Hat Jack-o’-Lantern Mug | Easy to recognize and personalize |
| Minimal | Spiderweb Rim Plate | Makes good use of negative space |
| Witchy | Moth and Crescent Moon Dish | Works beautifully with a restrained palette |
| Gothic | Gothic Rose and Bat Plate | Decorative without being overly gruesome |
| Creepy | Eyeball Bowl | Strong impact from one bold motif |
| Unusual | Hidden Face Mug | Adds a fun surprise when the cup is used |
Create Your Own Halloween Pottery Idea
If none of the finished designs feel quite right, build your own using a simple formula:
pottery form + motif + mood + one signature detail
| Choose a base | Choose a motif | Choose a mood | Add one detail |
|---|---|---|---|
| Mug | Ghost | Cute | Tiny stars |
| Plate | Black cat | Classic | Crescent moon |
| Bowl | Eyeballs | Creepy | Dripping rim |
| Trinket dish | Snake | Gothic | Gold stars |
| Vase | Bats | Minimal | Black-and-cream palette |
| Planter | Monster | Playful | Funny expression |
A plain mug can feel completely different depending on whether you add smiling ghosts, a gothic moth, a trail of bats, or a creepy face hidden inside.
If you are working with a flat ceramic surface, these easy plate painting ideas for beginners offer more rim patterns, florals, fruit, and seasonal layouts that suit a circular plate.
Save this post for later so you have a few designs ready for your next pottery-painting session.
25 Halloween Pottery Painting Ideas
This collection mixes mugs, plates, bowls, dishes, planters, and vases, with styles ranging from cheerful and cute to dark and gothic.
1. Tiny Ghost Mug
Best on: Mug
Mood: Cute / minimal
Difficulty: Easy
Signature detail: Ghosts with different expressions
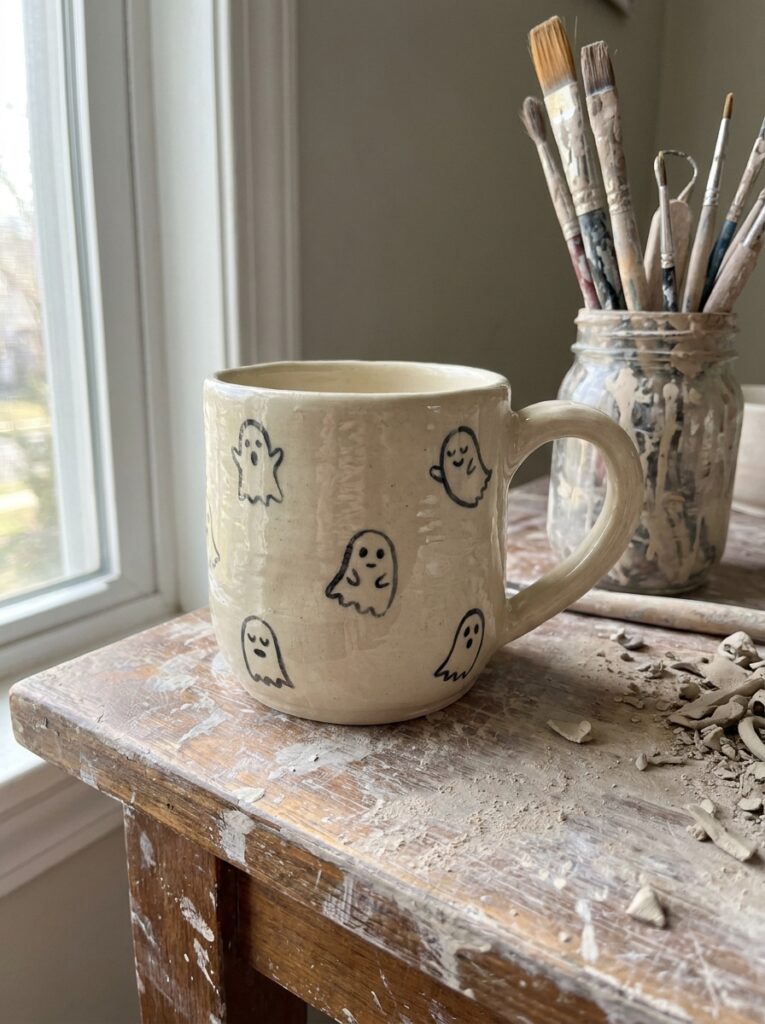
Scatter several small ghost shapes around the mug instead of painting one large character in the center. A cream or black background keeps the design simple, while tiny variations in the eyes and mouths give each ghost its own personality. Leave plenty of open space between them so the pattern does not feel crowded. This is a forgiving beginner design because slightly uneven outlines make the ghosts look more handmade and expressive.
2. Witch-Hat Jack-o’-Lantern Mug
Best on: Mug
Mood: Classic / playful
Difficulty: Easy–medium
Signature detail: Moon-and-star witch hat
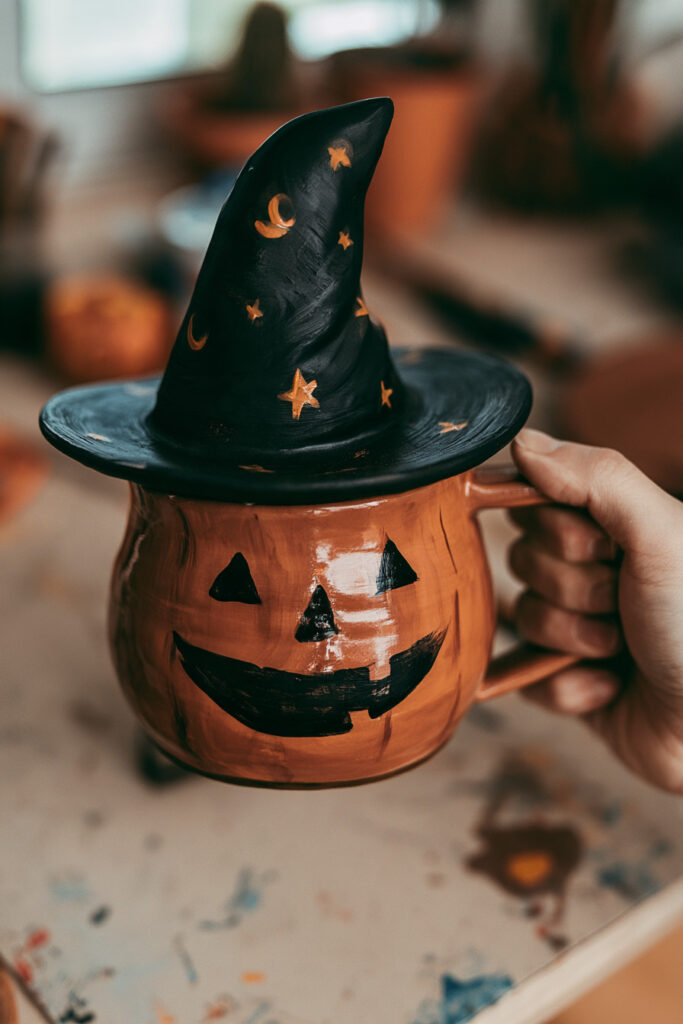
Paint a cheerful jack-o’-lantern as the focal point, then give it an oversized black witch hat decorated with tiny yellow or muted gold stars and crescent moons. Let the tip of the hat curve slightly around the mug instead of squeezing the whole design onto the front. A simple orange, black, cream, and yellow palette keeps the piece recognizably Halloween while the patterned hat gives it a more distinctive finish.
3. Black Cat and Crescent Moon Plate
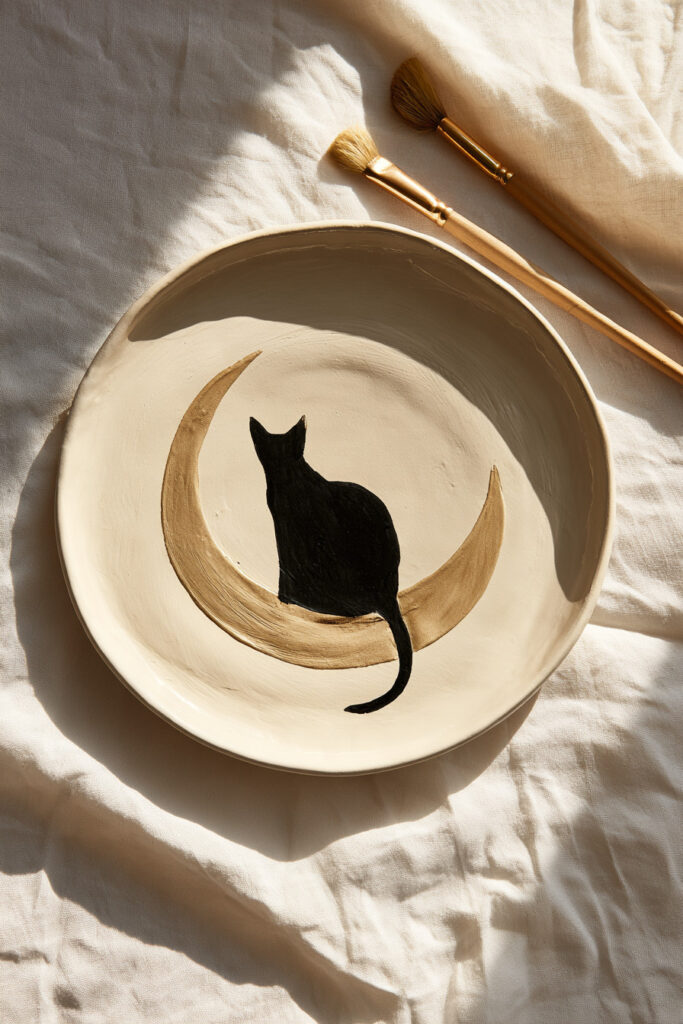
Best on: Plate
Mood: Classic / witchy
Difficulty: Easy
Signature detail: Cat silhouette following the moon
Place a large crescent moon slightly off center and tuck a black cat silhouette into its curve. A few scattered stars can balance the empty areas without filling the whole plate. Cream, black, midnight blue, and muted gold work especially well together. Keep the cat shape simple enough to read clearly from a distance rather than adding lots of fur or facial detail.
4. Spiderweb Rim Plate
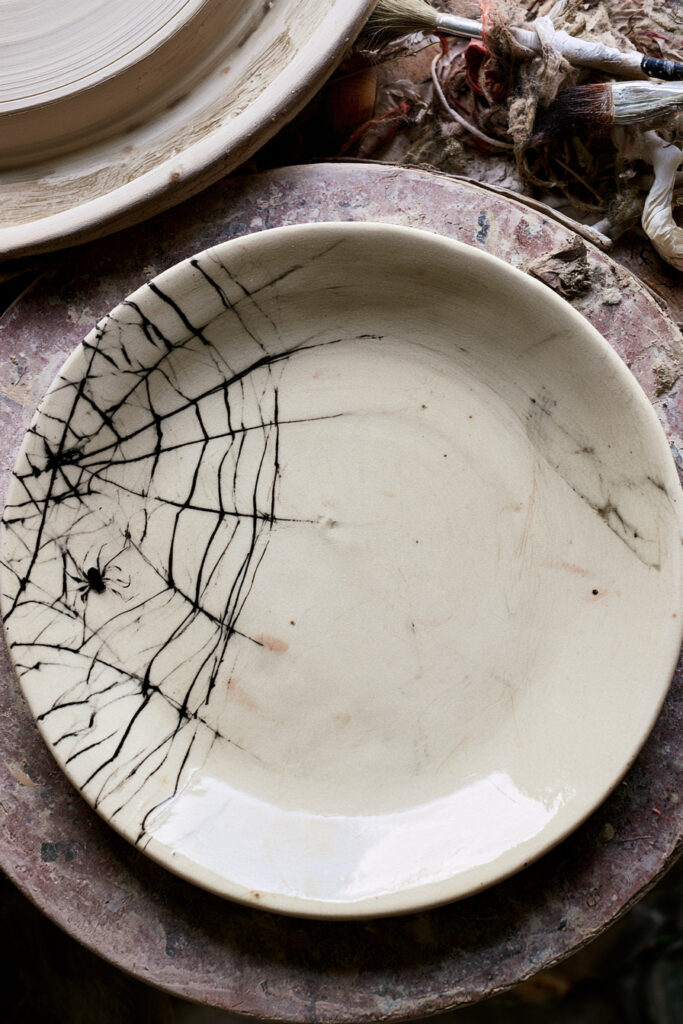
Best on: Plate
Mood: Minimal / classic
Difficulty: Easy
Signature detail: Web concentrated around the edge
Turn the circular rim of the plate into part of the design by painting a spiderweb around one side or gradually stretching it around the edge. Keep most of the center empty to make the web stand out. One tiny spider is enough to complete the idea. This is an easy Halloween ceramic painting option if you prefer clean designs and do not want to fill the entire surface.
5. Flying Bats and Full Moon Mug
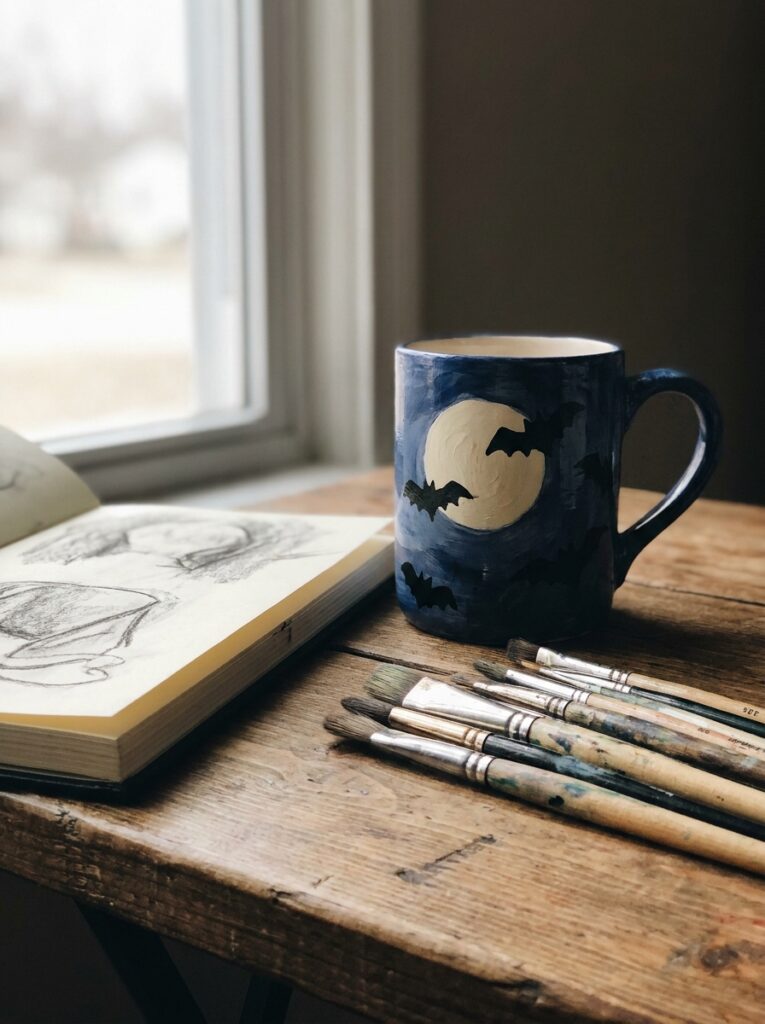
Best on: Mug
Mood: Classic / moody
Difficulty: Easy
Signature detail: Bats wrapping toward the moon
Paint a pale full moon on one side of the mug, then add a trail of black bat silhouettes moving toward or away from it. Vary the size of the bats so the scene feels more natural. Instead of lining them up in a straight row, let the pattern travel around the curve of the mug. A dark blue, cream, and black palette creates a simple nighttime effect without requiring complicated detail.
6. Dancing Skeleton Bowl
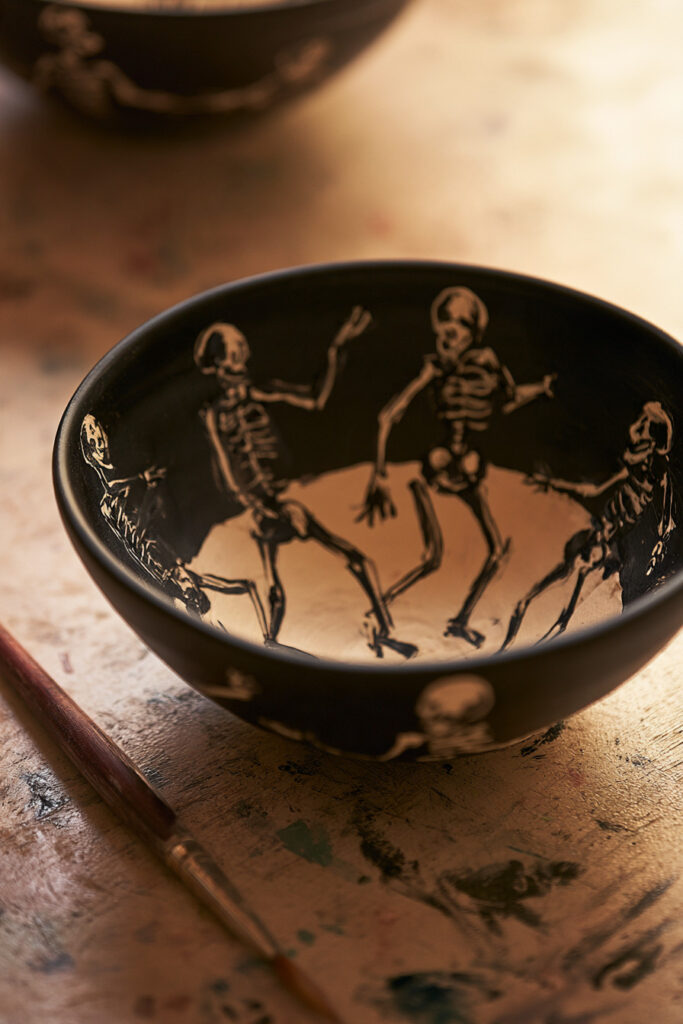
Best on: Bowl
Mood: Playful / spooky
Difficulty: Medium
Signature detail: Loose skeleton poses
Paint several simple skeletons around the outside of the bowl, giving each one a different pose. One can wave, another can kick a leg out, and another can look like it is dancing. There is no need to make the bones anatomically precise; simple lines and rounded shapes work better for this playful style. Use black and cream as the base colors, then add one accent shade such as orange, purple, or green.
7. Haunted House Plate
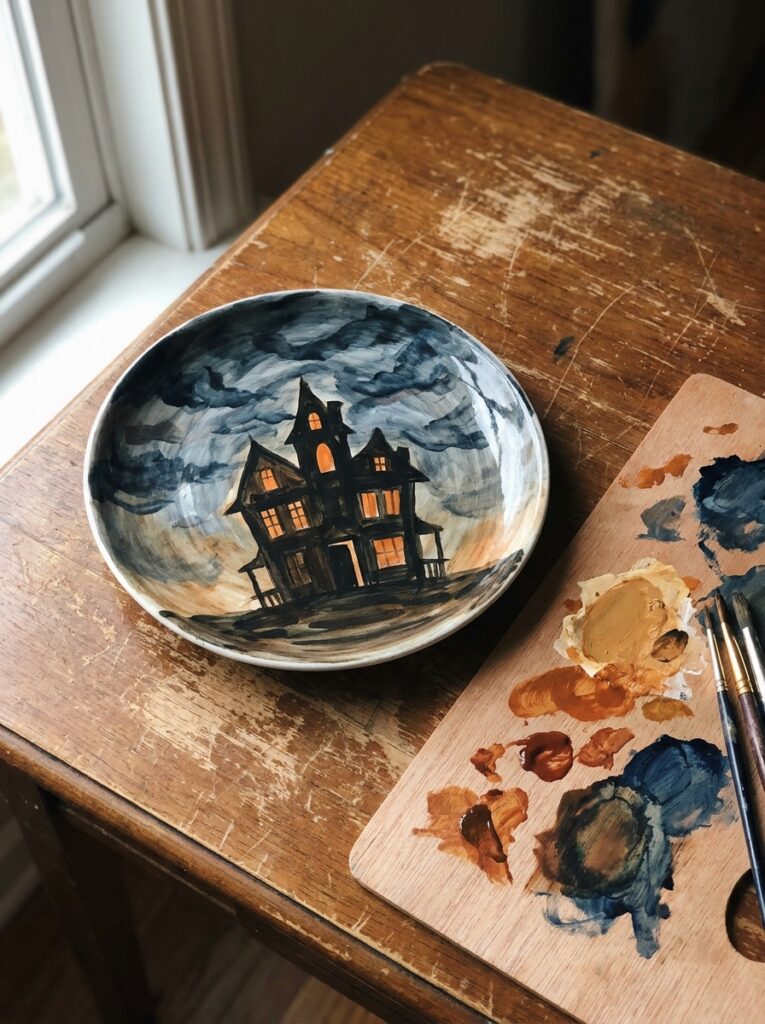
Best on: Plate
Mood: Spooky / storybook
Difficulty: Medium
Signature detail: Glowing windows
Create a crooked haunted house silhouette beneath a moon or cloudy night sky. Paint the windows in a warm yellow or orange so they look as though they are glowing against the darker background. Start with the large shape of the house first, then add rooflines, windows, branches, and other details afterward. Keeping the architecture slightly uneven helps the design feel whimsical rather than overly precise.
8. Friendly Frankenstein Mug
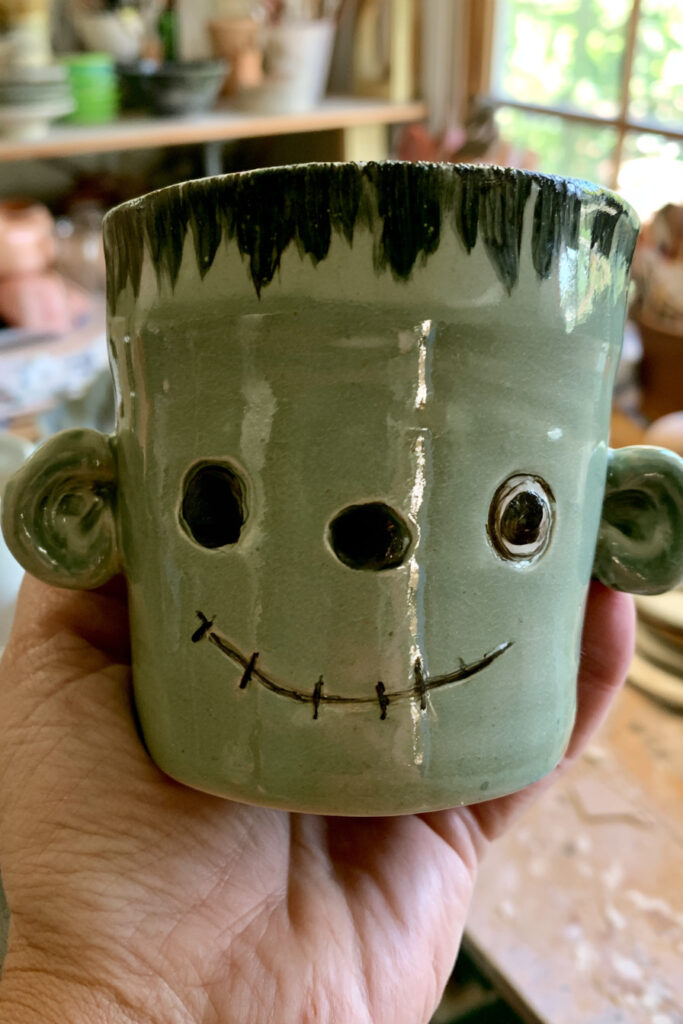
Best on: Mug
Mood: Cute / classic
Difficulty: Easy
Signature detail: Uneven stitched smile
Use the mug itself as Frankenstein’s face. Paint it a muted green, add simple black hair around the upper edge, then finish with expressive eyes, a stitched smile, and a few small scars. The charm comes from giving the character personality rather than making both sides perfectly symmetrical. Slightly mismatched eyes or uneven stitches can make the finished mug feel much more playful.
9. Pumpkin Patch Serving Bowl
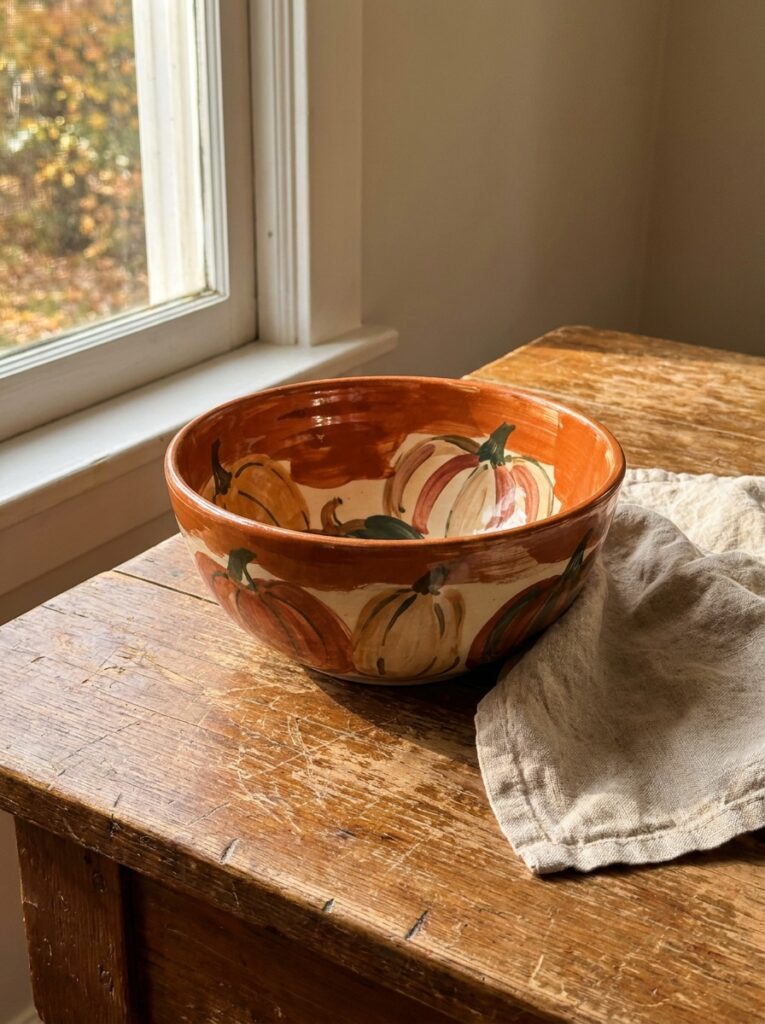
Best on: Bowl
Mood: Autumnal / classic
Difficulty: Medium
Signature detail: Varied pumpkin shapes
Paint a loose pumpkin patch around the outside of the bowl using a mixture of tall, round, and squat pumpkins. Burnt orange, rust, cream, dark green, and brown keep the palette seasonal while still feeling Halloween-ready. Avoid repeating the exact same pumpkin shape over and over. Small changes in stems, stripes, and proportions will make the pattern feel more naturally hand-painted.
10. Ghost Pattern Trinket Dish
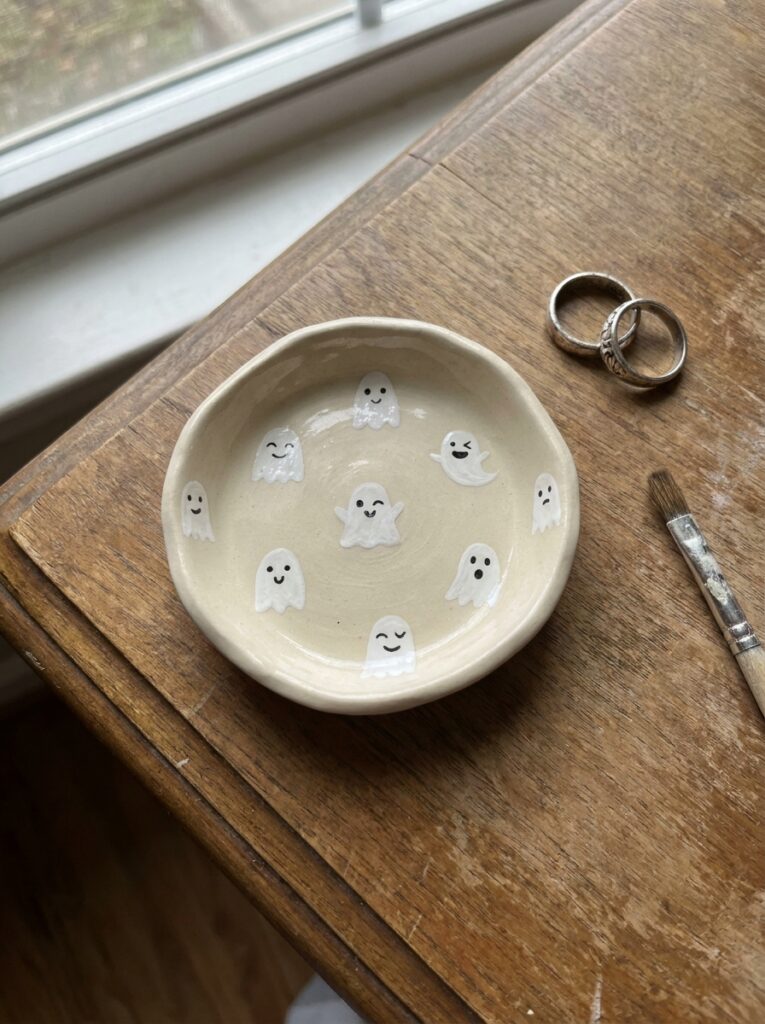
Best on: Trinket dish
Mood: Cute / simple
Difficulty: Easy
Signature detail: Repeating mini ghosts
A small trinket dish is perfect for a repeating ghost pattern because the limited surface keeps the design manageable. Paint tiny ghosts facing in slightly different directions, or change their expressions from one to the next. Stick with two or three colors so the pattern stays clean. A cream dish with black details works well, but you can reverse the palette for a moodier version.
11. Ghost Cat Mug
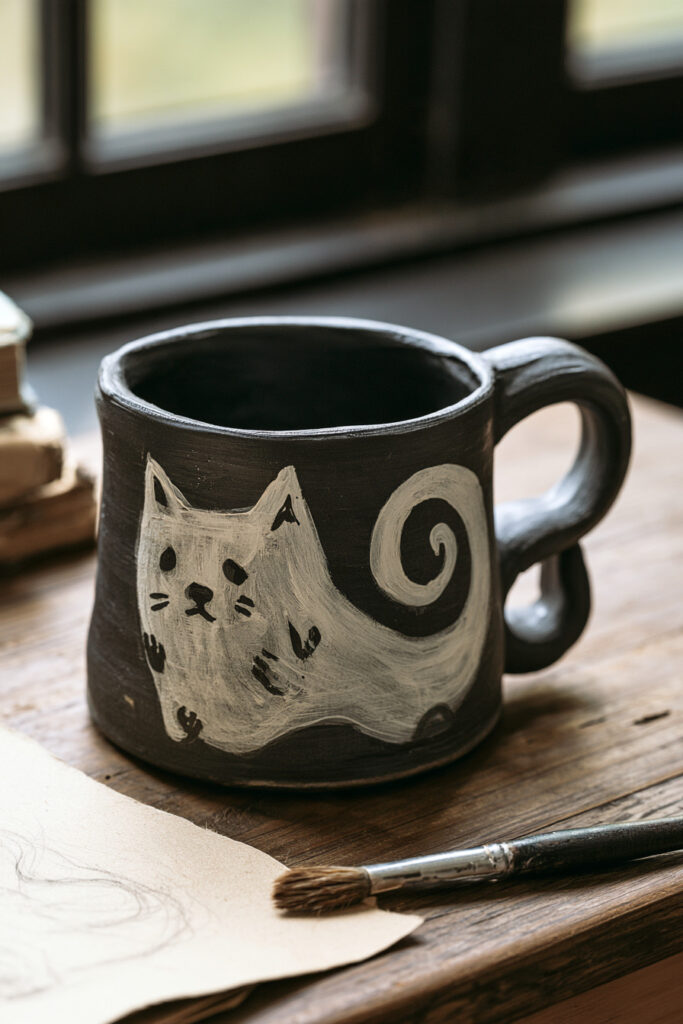
Best on: Mug
Mood: Cute / quirky
Difficulty: Easy–medium
Signature detail: Cat ears built into the ghost shape
Combine two Halloween favorites by turning a simple ghost into a cat. Add pointed ears to the top of the ghost shape, then include tiny paws, whiskers, or a curling tail. A white ghost cat on a dark mug creates strong contrast, but a cream mug with black details works just as well. Let the tail wrap around the side so the design makes use of the mug’s curved surface.
12. Pumpkin Cat Plate
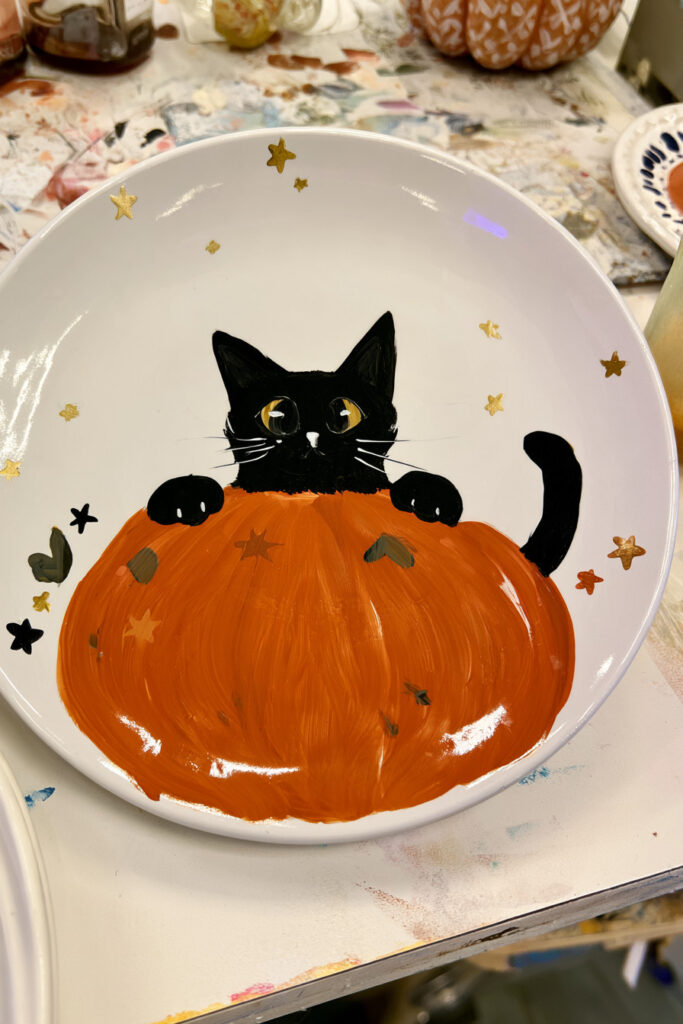
Best on: Plate
Mood: Cute / whimsical
Difficulty: Medium
Signature detail: Cat peeking from a pumpkin
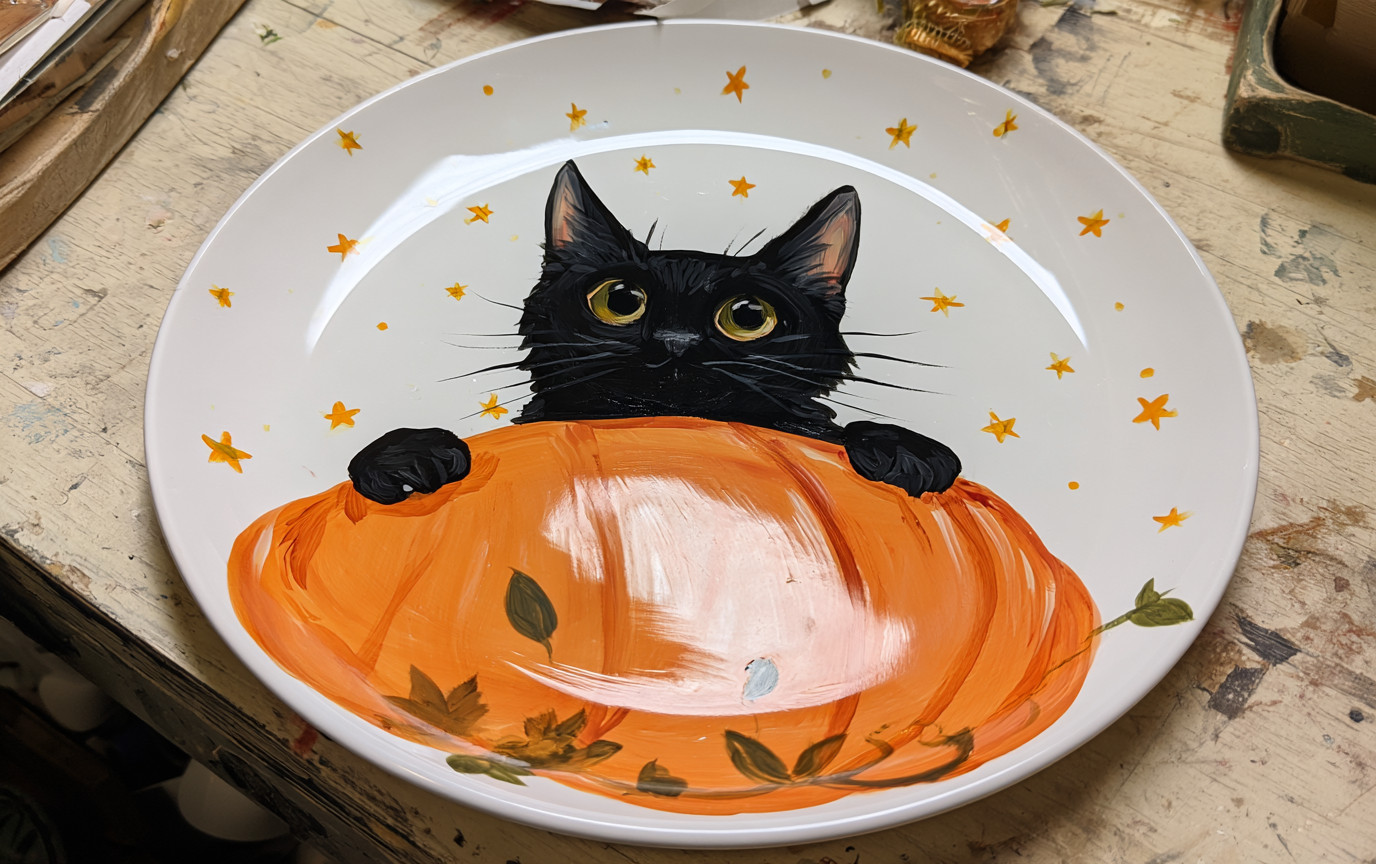
Paint one large pumpkin as the main shape, then add a black cat peeking over the top or popping its head through the opening. You can include paws resting on the pumpkin edge to make the interaction clearer. Keep the silhouettes bold enough to read easily from across the table. A few small stars or leaves can fill awkward spaces, but the cat and pumpkin should remain the focus.
13. Candy Corn Checkerboard Dish
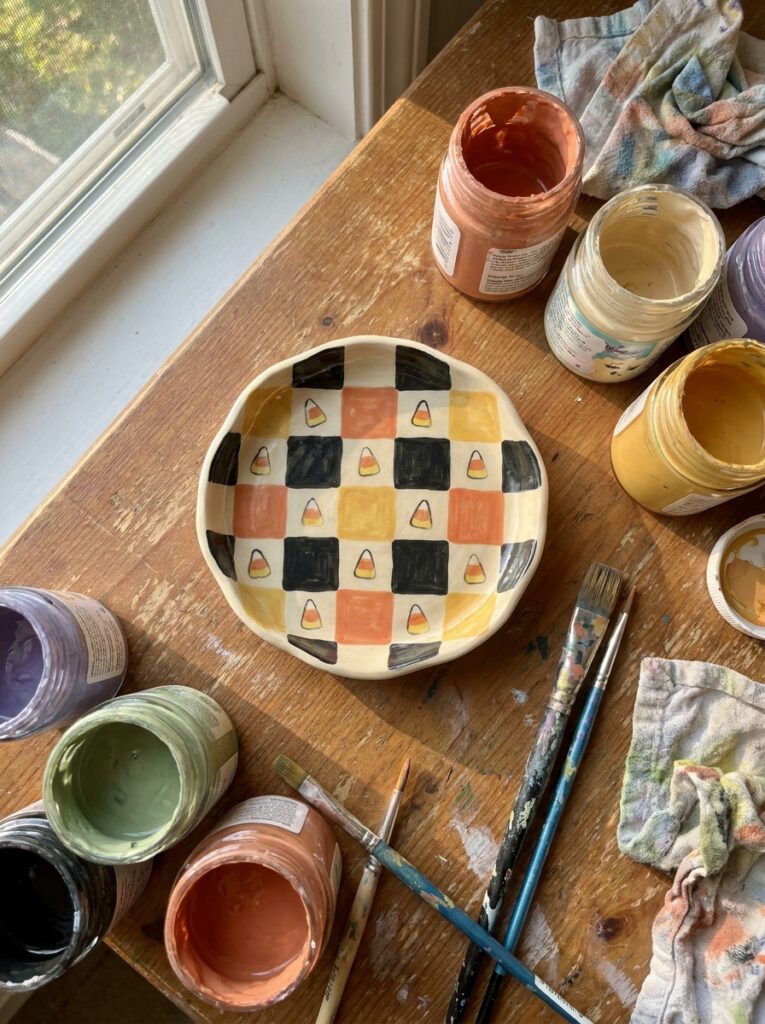
Best on: Small dish
Mood: Retro / playful
Difficulty: Easy–medium
Signature detail: Checkerboard with candy-corn colors
Give a simple checkerboard pattern a Halloween twist with cream, orange, yellow, and black. Instead of covering the entire dish, try painting the pattern around the rim or across only one half. Slightly imperfect lines can make the piece feel more charming and handmade than ruler-straight squares. A few tiny candy-corn motifs can be added as accents if the design needs more Halloween character.
14. Smiling Monster Planter
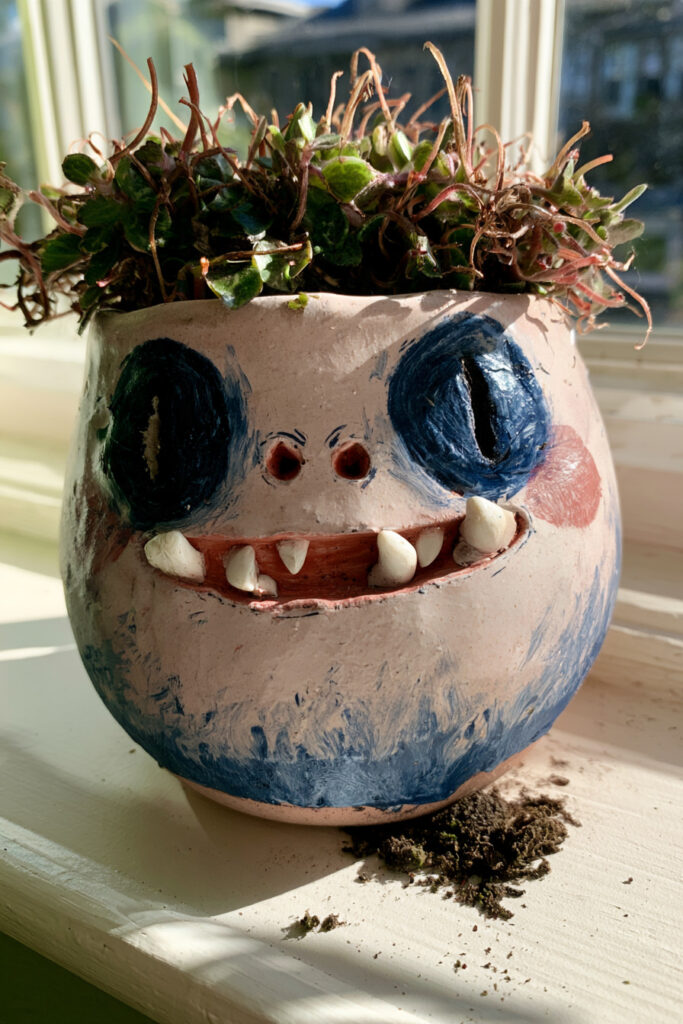
Best on: Planter
Mood: Playful
Difficulty: Easy
Signature detail: The plant becomes the monster’s hair
Paint a large pair of eyes and a funny mouth on the front of a planter, then let the foliage above become the monster’s wild hair. Green, purple, orange, or even a neutral cream base can work. Different expressions completely change the personality, so experiment with sleepy eyes, a crooked grin, tiny fangs, or raised eyebrows. It is a simple design that becomes more fun once a plant is added.
15. Peekaboo Ghost Bowl
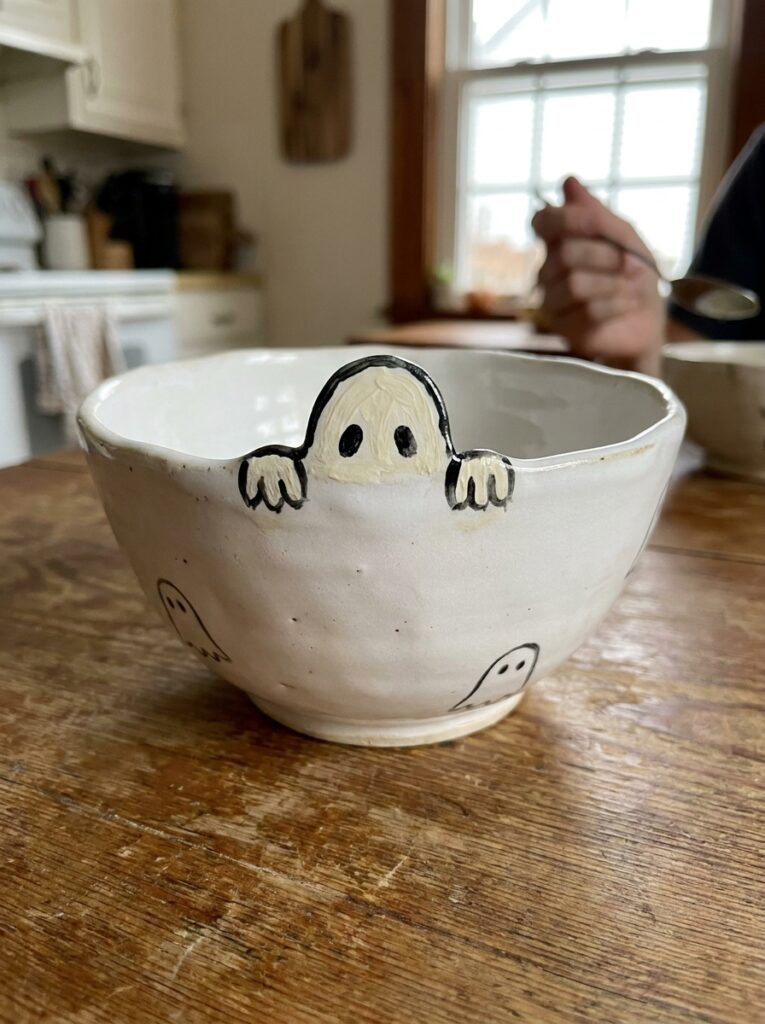
Best on: Bowl
Mood: Cute / surprising
Difficulty: Easy
Signature detail: Ghost peeking over the rim
Instead of centering the design on the side of the bowl, paint a ghost so its head and hands appear to be peeking over the rim. This makes the shape of the pottery part of the illustration. Keep the rest of the bowl fairly simple, or add a few tiny ghosts around the outside. A minimal cream, white, and black palette helps the peekaboo effect stay clear.
16. Moth and Crescent Moon Dish
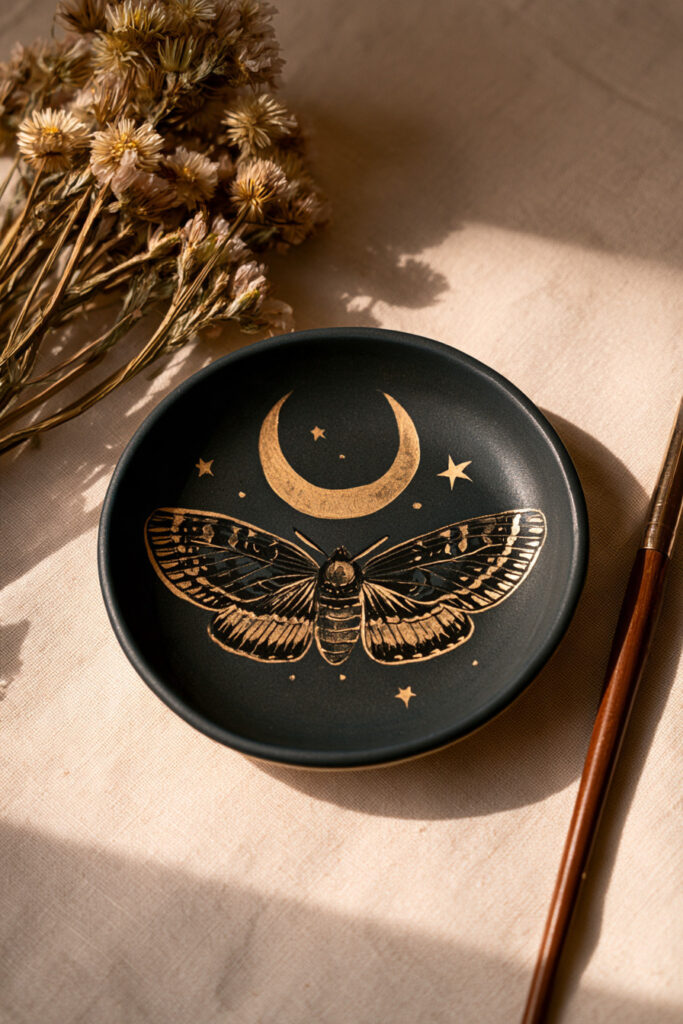
Best on: Trinket dish
Mood: Witchy / gothic
Difficulty: Medium
Signature detail: Moth beneath a crescent moon
Center a moth beneath a crescent moon and surround it with only a handful of small stars or dots. Black, cream, dusty blue, muted violet, and gold-inspired tones suit the celestial look. If detailed wings feel intimidating, break the markings into a few larger shapes rather than painting dozens of tiny lines. The symmetry of the moth naturally creates an elegant focal point.
17. Snake and Stars Trinket Dish
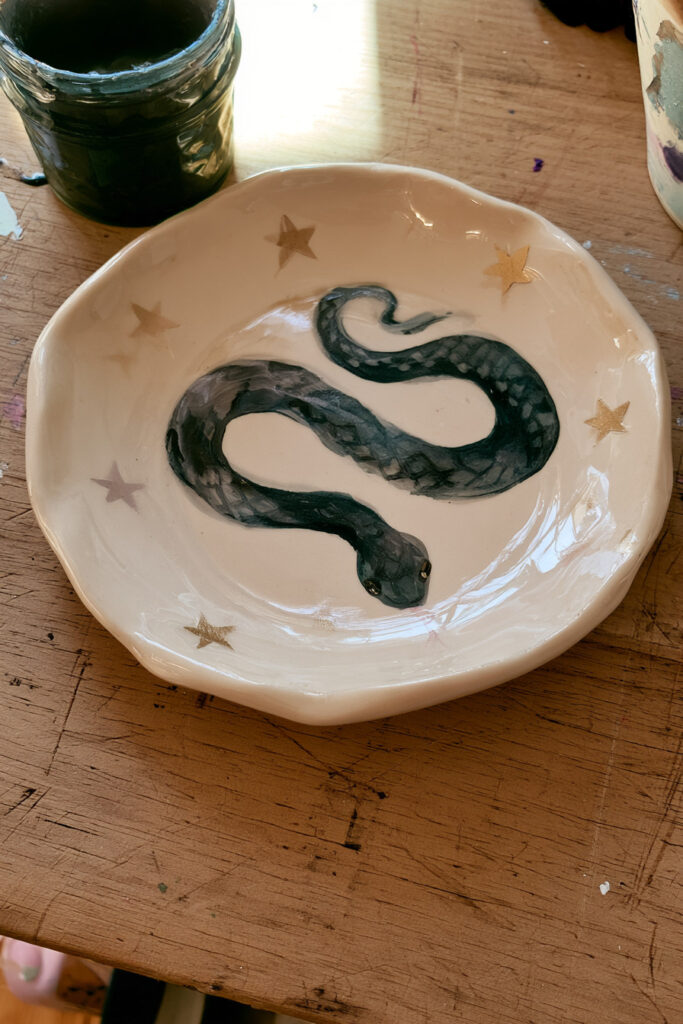
Best on: Trinket dish
Mood: Gothic / witchy
Difficulty: Medium
Signature detail: Snake following the curved edge
Paint a simple snake curling around the edge of the dish so the composition follows its circular form. Dark green, black, cream, and muted gold make a strong palette. Tiny stars can fill small empty spaces without distracting from the snake. Skip detailed scales if you want an easier version; an S-shaped body with a clearly defined head is enough to make the motif recognizable.
18. Potion Label Mug
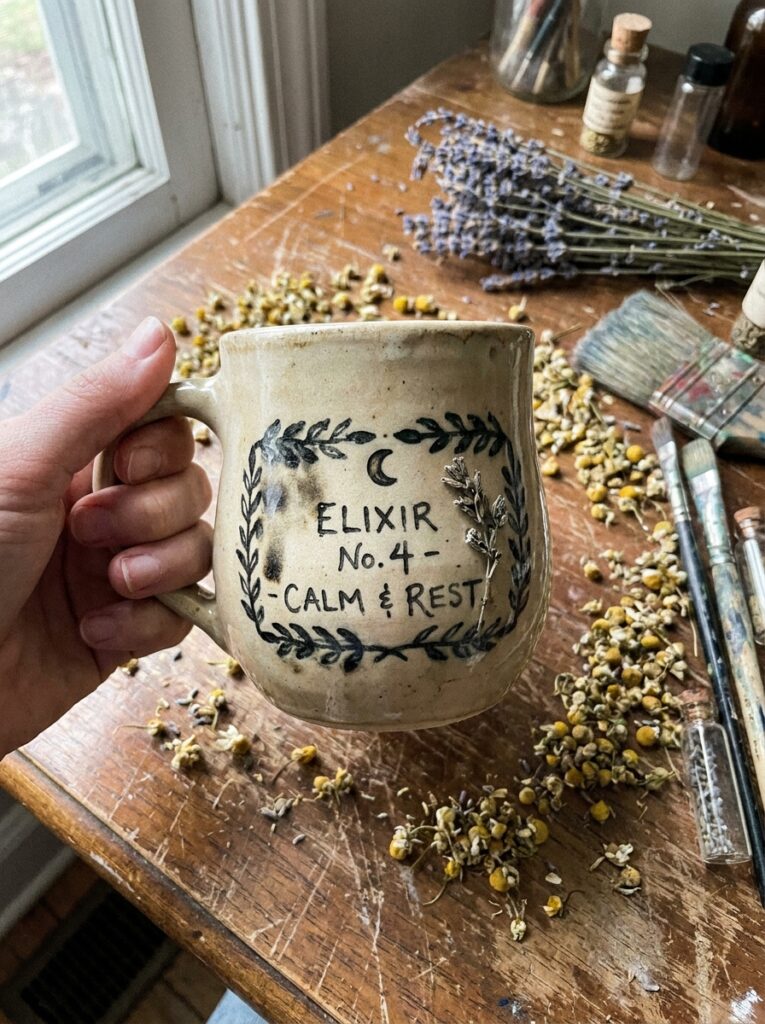
Best on: Mug
Mood: Witchy / vintage
Difficulty: Medium
Signature detail: Apothecary-style label
Turn the front of the mug into an old-fashioned potion bottle label. Choose one fictional potion name, frame it with a decorative border, and add a tiny moon, herb sprig, star, or bottle illustration. Avoid squeezing too much lettering onto the surface. One bold title and a few decorative details will usually look stronger than several lines of tiny text.
19. Gothic Rose and Bat Plate
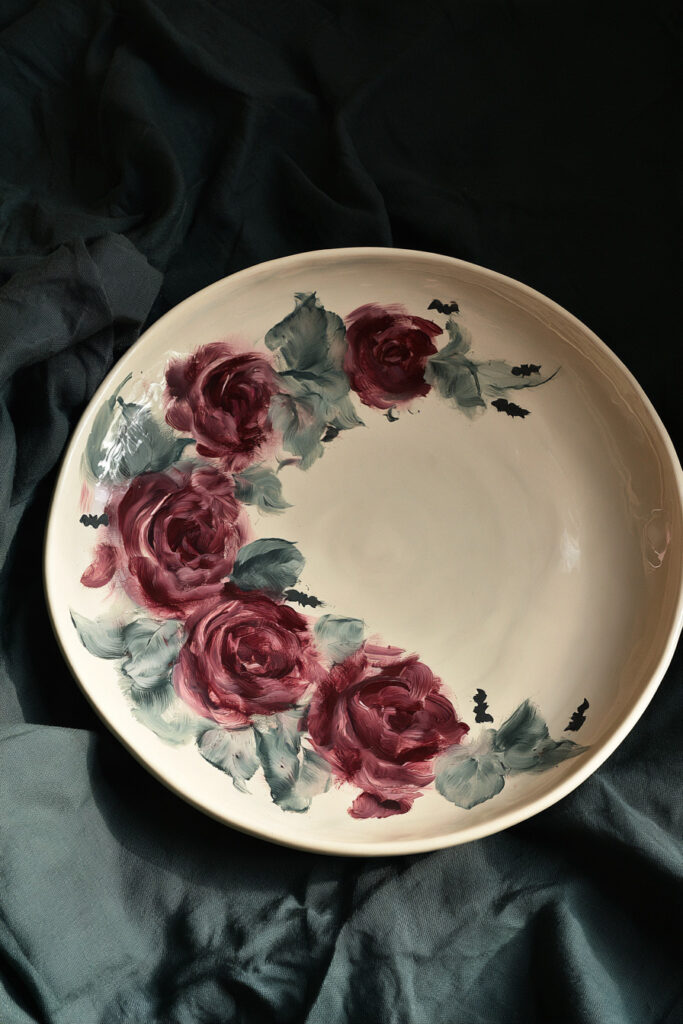
Best on: Plate
Mood: Gothic / romantic
Difficulty: Medium
Signature detail: Florals contrasted with bats
Cluster a few burgundy or dusty rose flowers along one side of the plate, then add small black bats around them. Keeping the composition asymmetrical makes it feel more decorative and less formal. Cream, burgundy, black, and muted green create a moody palette without relying entirely on orange and purple. Let the roses remain the main feature and use the bats as small accents.
20. Moon Phase Vase
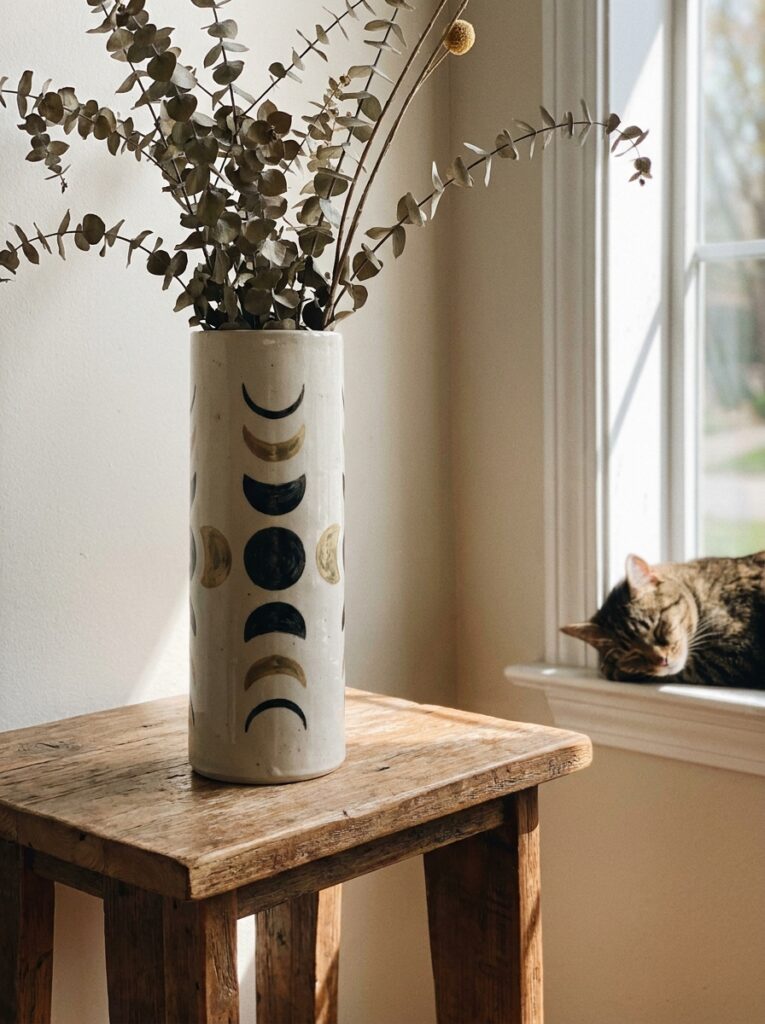
Best on: Vase
Mood: Witchy / minimal
Difficulty: Easy
Signature detail: Repeating moon phases
Use the tall shape of the vase to arrange moon phases vertically from top to bottom, or wrap them in a simple band around the center. Black and cream create a striking minimalist version, while navy and muted gold give the design a softer celestial mood. Because the moons repeat, you can keep the shapes simple and let spacing create most of the visual interest.
21. Eyeball Bowl
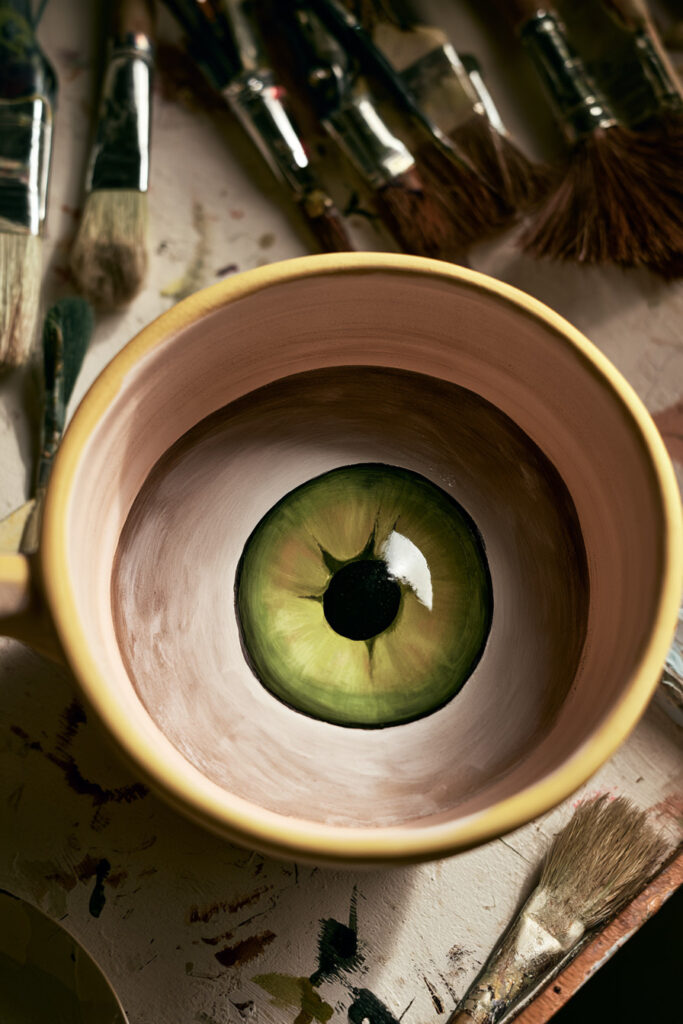
Best on: Bowl
Mood: Creepy / graphic
Difficulty: Easy–medium
Signature detail: Oversized eye inside the bowl
Use the round interior of the bowl as one giant eyeball. Paint the iris in green, blue, amber, or an unnatural Halloween shade, then build the pupil and surrounding details around it. The rim can stay plain or feature a few smaller eyes or dripping shapes. Keeping the design bold and graphic often creates a stronger effect than trying to make the eye look highly realistic.
22. Hidden Face Mug
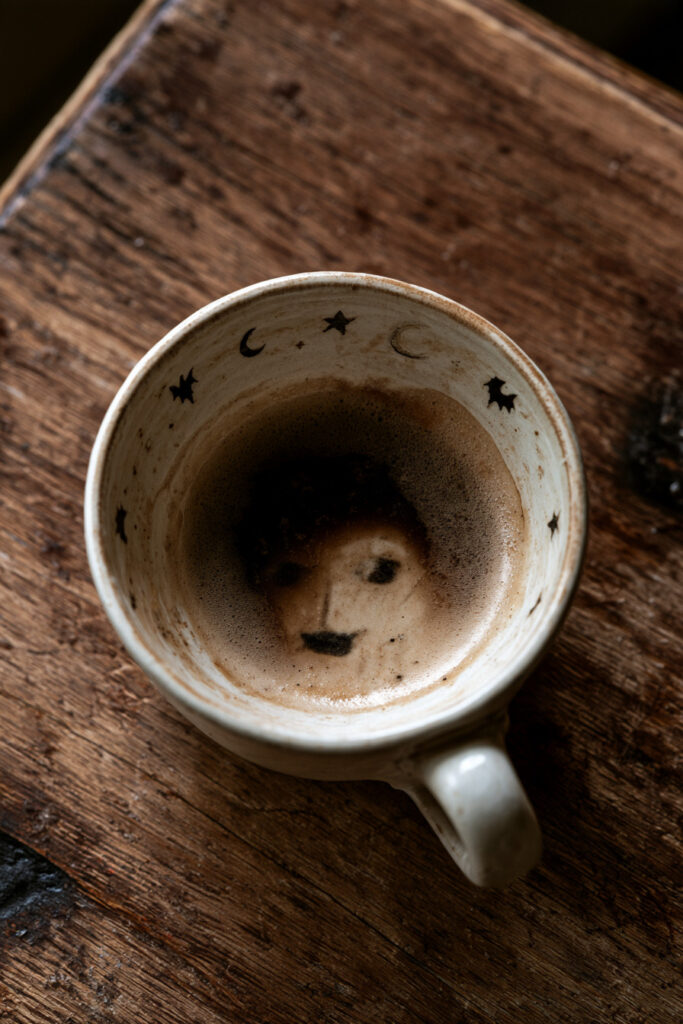
Best on: Mug
Mood: Creepy / surprising
Difficulty: Medium
Signature detail: Face revealed inside the cup
Paint the exterior with a complete Halloween pattern—bats, stars, stripes, moons, or another simple motif—then add a hidden face inside the mug as a surprise. The reveal works best when the cup still looks finished and interesting from the outside. Keep the interior face fairly simple so it remains easy to recognize when someone reaches the bottom of their drink.
23. Creepy Insect Plate
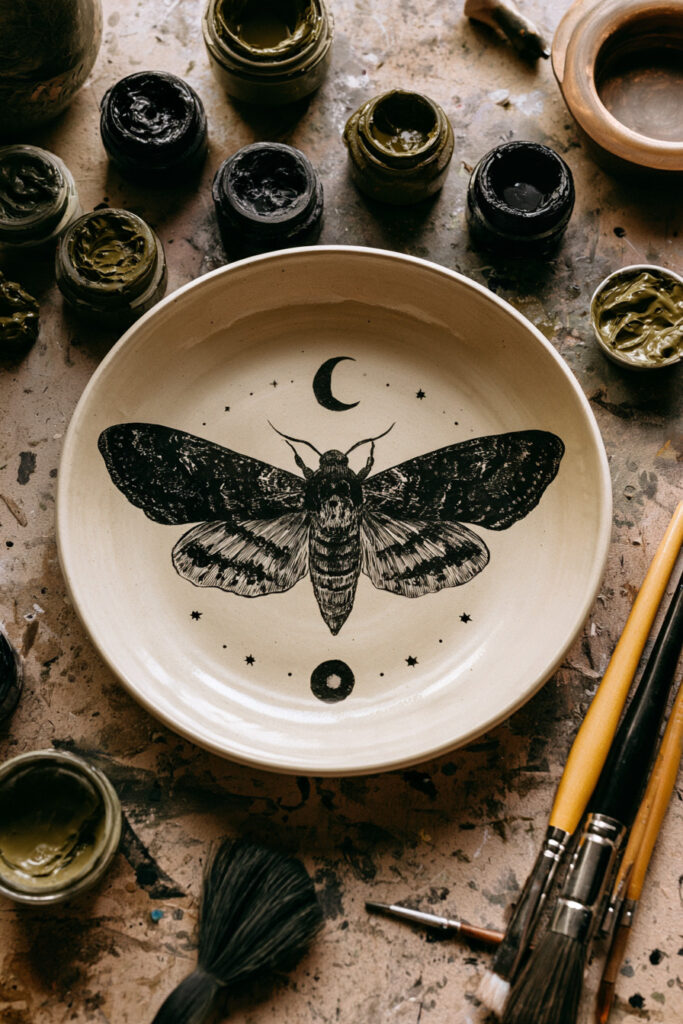
Best on: Plate
Mood: Dark / unusual
Difficulty: Medium
Signature detail: One oversized insect
If you want something beyond pumpkins and ghosts, make one moth, beetle, or spider-like insect the center of the plate. Use bold symmetrical wings or body shapes rather than trying to reproduce every tiny anatomical detail. Black, cream, brown, olive, and muted burgundy all suit this darker look. A few small celestial symbols can soften the composition if the central insect feels too stark on its own.
24. Dripping Candle Vase
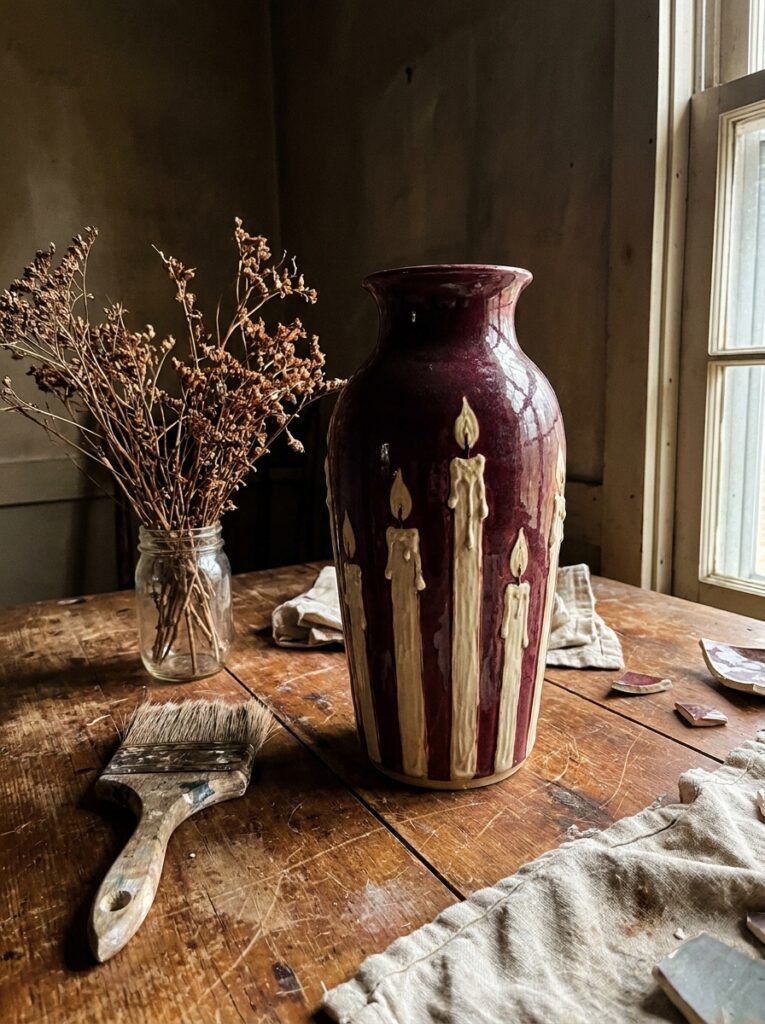
Best on: Vase
Mood: Gothic / atmospheric
Difficulty: Medium
Signature detail: Wax drips following the vase
Use the vertical shape of a vase to paint long cream-colored candle forms with wax dripping downward. A black, burgundy, or deep green background gives the pale drips plenty of contrast. Small flames, stars, or moons can be added sparingly near the top. Keep the drips different lengths so the composition feels organic rather than creating an evenly spaced striped pattern.
25. Haunted Cottage Mug
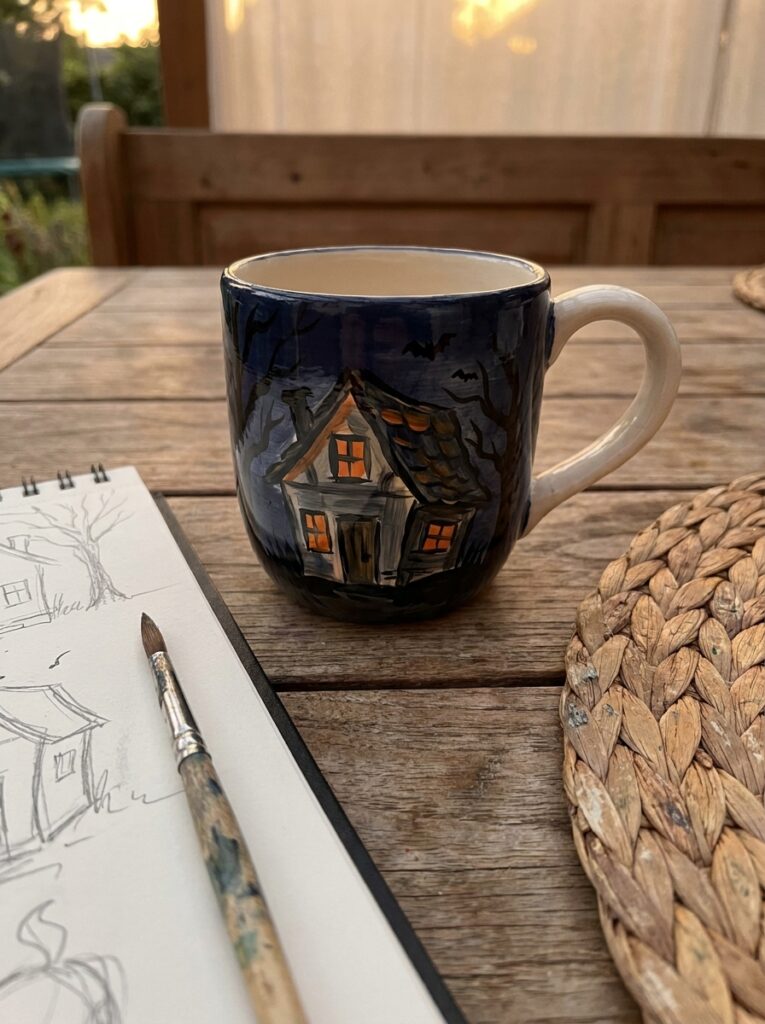
Best on: Mug
Mood: Cozy-spooky
Difficulty: Medium
Signature detail: Warmly lit cottage
Paint a tiny crooked cottage with glowing windows, then continue a dark night sky around the rest of the mug. Add a few bare trees, bats, or stars without filling every space. Warm yellow windows against navy, black, or deep purple create the cozy-spooky contrast that makes this idea work. Keep the architecture loose and illustrative instead of worrying about perfectly straight walls or windows.
Simple Tips for Painting Halloween Pottery
Start With a Limited Color Palette
Using three to five colors can make a Halloween design feel much more cohesive.
- Classic: orange + black + cream
- Cute: pastel orange + lavender + cream + black
- Witchy: black + dusty blue + muted gold
- Gothic: burgundy + black + cream
- Minimal: black + cream
You can still add tiny accent colors, but choosing the main palette before you begin makes it easier to keep the finished piece visually connected.
Let the Pottery Shape Guide the Design
Some of the most interesting Halloween pottery ideas work because the artwork responds to the object itself.
A crescent moon can follow the curve of a plate. A snake can curl around a trinket dish. Ghosts can peek over a bowl rim. Moon phases can travel vertically down a vase, while bats can sweep around the side of a mug.
If you want more designs created specifically for curved bowls, browse these pottery bowl painting ideas for easy borders, patterns, florals, and themed motifs.
Rather than treating the pottery like a flat sheet of paper, look for ways its shape can become part of the scene.
Paint the Large Shapes First
Start with the largest pumpkin, moon, cat, ghost, house, or other focal shape before adding tiny stars, facial features, stitches, windows, or decorative lines.
This gives you a chance to judge the overall composition while it is still simple. Once the main shapes feel balanced, the smaller details are much easier to place.
Sketch Complicated Layouts Before Adding Details
Designs with skeletons, haunted houses, lettering, insects, or gothic florals can benefit from a simple layout sketch first.
Focus on where the largest shapes will sit rather than trying to plan every small mark. The goal is to avoid discovering halfway through the design that the main motif is too large, too small, or awkwardly positioned.
Follow the Instructions for Your Specific Ceramic Paint or Studio
Ceramic paints, pottery studios, and finishing systems can have different instructions. Follow the directions provided with the materials you are using, especially for anything involving curing, glazing, firing, food contact, microwave use, or dishwasher use.
If you are using kiln-fired underglaze, check the manufacturer’s directions for the exact product. Mayco’s Fundamentals underglaze guidance is one example of product-specific application and firing instructions.
For already-fired decorative ceramics, check the craft-paint label as well. DecoArt’s Multi-Surface Acrylic instructions include product-specific curing directions and state that the paint is not for food-contact surfaces.
Make the Design Your Own
You do not have to recreate any Halloween pottery painting idea exactly as shown. Swap the palette, change the facial expression, combine two motifs, simplify a complicated design, or move an idea from a mug to a bowl or plate.
A useful formula is:
form + motif + mood + one signature detail
That might become a mug + ghost + cute + tiny stars or a trinket dish + snake + gothic + crescent moons.
Start with the combination that sounds fun to paint, then let the handmade imperfections become part of the finished piece.
Want another Halloween painting project? These easy Halloween watercolor paintings use many of the same ghosts, pumpkins, moons, cats, and witchy motifs on paper.
Halloween Pottery Painting FAQs
What are the easiest Halloween pottery painting ideas for beginners?
Tiny ghosts, jack-o’-lantern faces, bats, spiderwebs, simple monster faces, and moon phases are some of the easiest designs to start with.
They rely on recognizable silhouettes, limited color palettes, and fairly simple shapes. They also do not require perfectly precise linework, so small variations can still look intentional and handmade.
What can I paint on Halloween pottery besides pumpkins?
Halloween pottery can feature ghosts, black cats, bats, moths, snakes, skeletons, spiderwebs, haunted houses, monsters, potion labels, moons, stars, eyeballs, insects, and gothic flowers.
Combining two motifs is another easy way to make the design feel less expected—for example, a ghost cat, a pumpkin with a cat peeking out, or roses surrounded by tiny bats.
How can I make Halloween pottery look cute instead of scary?
Use rounded shapes, simple smiling faces, softer colors, and playful details such as tiny stars, hearts, or rosy cheeks.
Ghost cats, friendly monsters, happy pumpkins, and wide-eyed bats all work well for a sweeter style. You can also swap harsh black-and-orange palettes for cream, lavender, muted peach, dusty blue, or pastel orange.
What Halloween designs work well on mugs?
Designs that take advantage of a mug’s curved surface work especially well. Try wrapping bats, repeated ghosts, potion labels, moon-and-cat scenes, Frankenstein faces, or haunted cottages.
Instead of placing every element on the front, let part of the design travel around the sides or interact with the handle.
For more mug-specific inspiration, browse these cute mug pottery painting ideas for additional cozy patterns, characters, and wraparound compositions.
What Halloween designs work well on plates?
Plates work particularly well for cat-and-moon scenes, spiderweb rims, haunted houses, gothic florals, oversized insects, and central pumpkin faces.
The circular surface makes it easy to build a composition around the center or use the outer rim as part of the design.