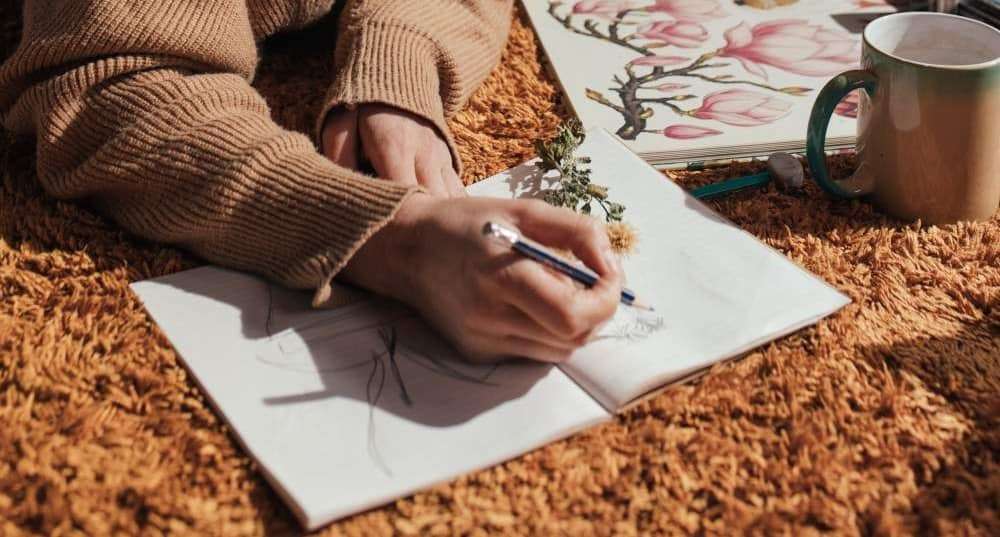
When you start to learn how to draw it can be difficult to know how best to practice. There are so many things you want to draw it is difficult to know where to start.
The 5 exercises below will all help you improve your drawing quickly and easily. Mastering them will take time. Each drawing you do should teach you new lessons and as your techniques develop you will see the improvements in your drawing.
Stick to the basics to start with. Stay focussed and practice regularly. It will all be worth it in the end.
Exercise 1: Drawing Lines
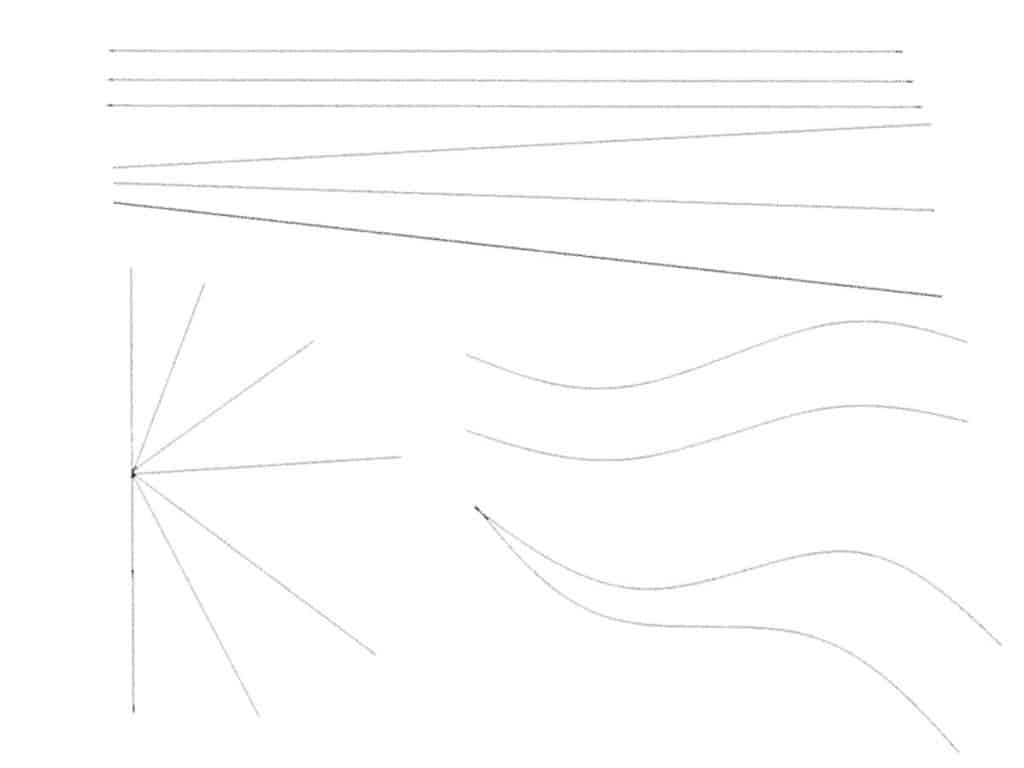
Drawing straight lines might not seem difficult, but it is something that can be applied in every drawing you do. Practice drawing straight parallel lines at the start, but as you progress draw lines that converge towards one end.
Another exercise is to draw straight lines radiating outwards from a single point. Vary the lengths but try to keep each line straight. An extension of this exercise is to draw a series of random dots on your piece of paper. Take your pencil and draw a straight line between any 2 of the dots. Reapeat this for any of the dots until you have drawn straight lines between every dot on the page.
This will improve your hand eye coordination and also your ability to visualise the lines you are trying to draw. Don’t worry or be surprised when some of the lines dont quite reach the dots as you intended. Remember it is all just practice.
When you are happy that you can draw the lines straight, go back and start each part of the exercise again, but make each line a slight curve. From single curves you can then progress to S-curves. Practicing these simple lines will help you in all of the next exercises.
Exercise 2: Learning How To Shade
Below are some ways you can shade that are quite different. You might well use all of them in a single drawing and practicing them will help you improve your results every time you draw.
The basics of shading are simple, but applying them can be more difficult. It is a skill well worth spending time practicing. If you use simple lines to shade, the closer those lines are together, the darker the shading will appear.
Getting the balance of dark to light right is important when trying to create depth and shape within a drawing. The lines you draw may delineate the shape, but it is the shading that will help bring life and depth to your drawings.
Some people will simply tell you that to shade well, you will need lots of different pencil grades. Although that can help, it isn’t necessary and it certainly isn’t the only solution.
Hardness Explained
The grade of a pencil relates to the hardness of the graphite used in the “lead”. Hard graphite will hold a sharp tip well, but leaves a lighter grey line. The softer the graphite the darker the lines will be. You will notice that to keep a sharp tip you need to sharpen softer pencils more often.
At the centre of the scale is the classic HB pencil, a good mixture of hardness and with a fairly dark color. It is always the best place to start. H grades are harder and lighter in color. B grades are softer and darker in color.
The higher the grade number, the more extreme the difference will be. So a 4B will be much softer and darker than a B grade pencil and a 4H will be much harder and lighter in color than an H or 2H grade. All the techniques below can be done with any grade of pencil, but each grade will give you different results.
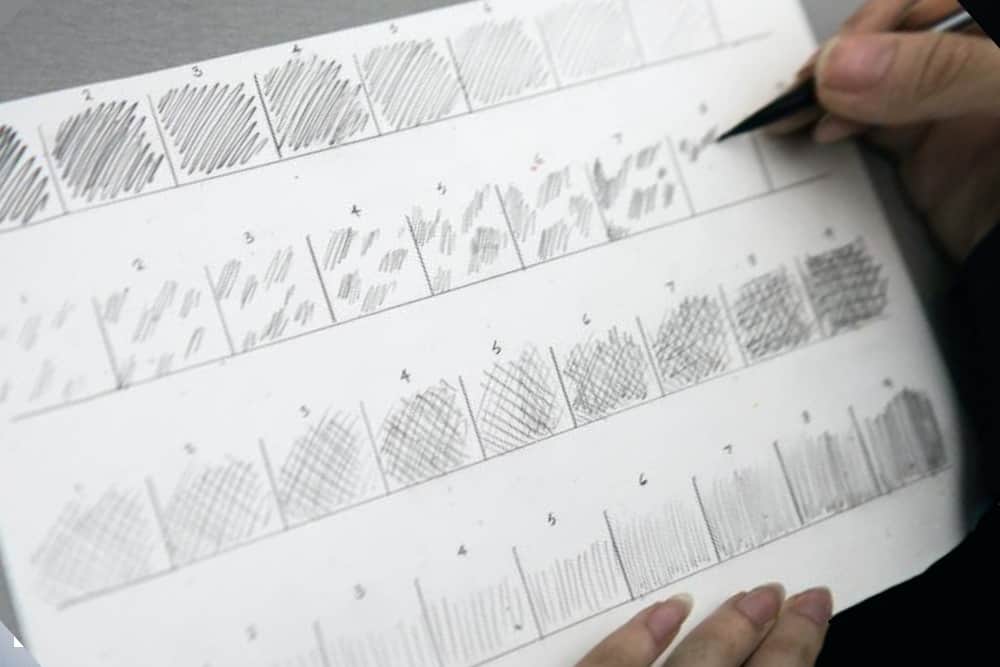
Directional Shading
Directional shading is a great way to emphasize the shapes within a drawing. For example, if you are drawing a cylinder, the curve of the cylinder can be shown by drawing a series of parallel curved lines on the shadowed side of the cylinder.
Remember, the closer together you draw the lines the darker the area will appear.
Crosshatching
Crosshatching is a little more complex. In its basic form 2 sets of straight lines are drawn at 90 degrees to each other to form an area that will immediately look darker than the same area if directional shading is used.
If you have used directional shading then you can darken areas within the shading if necessary by drawing in a second set of lines across the original directional shading.
For even darker areas you can crosshatch the area in 3 or even 4 directions. The more different directions you shade the darker the overall effect will be.
Shaping The Pencil Tip
Using sharp pencils will give you narrow distinct lines whereas using blunt pencils with a rounder tip, you will achieve wider lines with a softer edge. If you need a wider line with a sharper edge you can sharpen the pencil with sandpaper instead of a traditional sharpener to form a “chisel shaped” tip.
Always remember dark and light are relative terms. A dark area will appear much darker if there is an equivalent light area close by and vice versa. If the whole drawing is too dark or too light, not only will it appear flatter, but the dark and light areas will lose their impact.
Lift Off Any Excess
If you need to you can lift off some of the shading with a good putty rubber to help lighten areas to create contrast and emphasise the dark areas in the drawing.
Experiment With Your Techniques
Experiment with each of the techniques above and try them all using different pencil grades. Then try using them all in the same drawing. You will notice that with the softer B grade pencils you can also smudge the lines really easily. Keeping your drawing hand off the page will stop this causing problems, but you can use it as a way of softening the edges of both lines and more heavily shaded areas.
By using the techniques above you can create texture, shape and depth without the need for many different pencil grades, but using different pencil grades and using these techniques you can achieve amazing results remarkably easily.

Exercise 3: Drawing 3-Dimensional Shapes
This is 2 exercises in one really. The first stage you want to fill a piece of paper with as many different shapes as you can. Start with some basic geometric shapes like triangles and rectangles, but any shapes will do. Try making some of the shapes more random.
When you have done that, look at each shape and extend the simple drawing to make it 3-dimensional. The triangle will become a wedge shape and the rectangle becomes a cube.
Each shape will help you understand how to make the sections of your drawing look more solid. Your aim should be to make it look like you can grasp the shape straight from the page.
You can then introduce shading to make the shapes even more solid. Think about your light source and the shadows that the shape will make. This will help you give the object a physical presence in your drawings.
Exercise 4: Understanding Perspective And Creating Depth
Perspective is a big term, the first part is the concept that the same object will appear a different size depending on distance. It also describes the different appearance of an object when viewed from different angles.
This can sound confusing but really it is the same thing. The angle you are viewing an object from means certain areas of the object are closer than others and it is this difference that changes the shape and composition of any object within a picture, as well as the picture itself.
In simple terms
In simple terms, if you look at someone’s face from above, the forehead will appear larger. The eyes will not be quite as large in comparison and the nose, mouth and chin will all appear gradually smaller.
Using distortion
This may sound like a distorted image, but that distortion actually helps to create depth and shape in your drawing. The closer the point of view is to the object being viewed the more extreme those distortions become.
How to use perspective
Applied to a building this makes the part of the building closest appear largest, with the size gradually decreasing as parts of the object get further away. In a drawing this can again be emphasized by changing the place the picture is viewed from.
Emphasising characteristics
If you view a big building from below, its height will be emphasized. The base of the building will be larger, and there will be a gradual narrowing of all the angles and shapes as the height increases and the various parts of the image get further away. A line of windows will gradually get smaller as they recede into the distance.
Perspective in landscapes
In landscape paintings this can be used in many ways. The obvious one will be tree’s that are closest will appear much larger and more defined than similar tree’s in the distance. It can also help you to show the shape of valleys, houses, rivers and any other points of interest within the landscape.

An Easy Exercise
For this exercise you need to go back to the beginning and draw 2 straight lines that gradually get closer together on one end. The point where they come together is called the vanishing point. This can be on the page or you can visualise it off the side of the page depending on the drawing.
Draw a row of similar cubes reaching from one line to the other so they gradually get smaller. You will see that as you progress it looks like the smaller cubes are further away than the larger ones.
This is a basic principle that will help every drawing you do. In a close up portrait, you will see the effect of perspective too. The size of different parts of the face will seem bigger or smaller depending how far away they are from the viewer.
Exercise 5: Getting The Proportions Right
Some things are easy to get wrong. Getting proportions right is equally important in a landscape drawing or a portrait. Keeping things so they are the right size in relation to each other is vital if you are trying to make something look realistic.
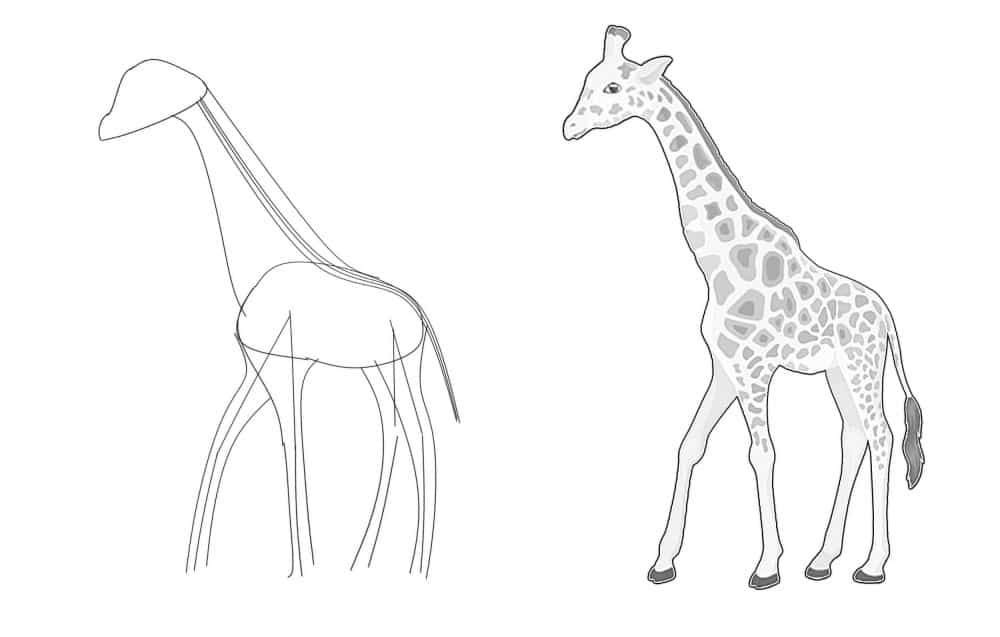
Drawing A Giraffe
In the various animal drawing tutorials you will see how it becomes really important. Our Giraffe drawing tutorial shows the length of the giraffes neck in relation to its body and legs. Getting this right will mean the difference between the final drawing looking right or wrong.
In our face drawing tutorial you will learn how the size of someone’s ears or nose, in relation to the rest of their face, can have an equally dramatic effect.
Use A Simple Grid
You can use a simple grid system to help you get the proportions right, but in time you will find you need to do this less. Another way to check and compare different areas of your drawing is to simply measure them.
Let us use the example of the giraffe. Go through any reference material you have and measure the length of the neck. Make a note of the figure and then measure the length of the front and rear legs making a note of the numbers.
The ratio of the sizes should always be the same. Ie, if in the reference material the neck is 10cm, the front legs are 6cm and the rear legs are 5cm then you can work out the proportions of any other giraffe.
The Ratio Of Sizes
Let us say in your drawing that the giraffes neck is 20cm. That means the sizes are twice as long (dont forget they will be twice as wide too). So, the front legs will be about 12cm long and the rear legs about 10cm long. As long as you stick to the proportions you can measure in your reference material you won’t go far wrong.
Learning to get these proportions right will take time, but it is worth it. As you practice and improve you will see how getting the proportions right will transform each of your drawings.
Final Thoughts
This list of exercises is just a start. Each of the exercises will help you improve every one of your drawings. Understanding the different ways you have improved is just as important. Keep your sketches, good and bad.
Every so often go back and look at them. Look at how your techniques have changed and evolved. Study the differences in the drawings you did a year ago when compared to the ones you have done more recently.
Set yourself regular challenges. Why not try a different one of our drawing tutorials every week or every month? As you do them try to notice the bits that become easier. When you decide to repeat one if you have kept your previous attempts you really will see a progression in both your ability and the style of your drawings.