

When it comes to drawing heads a basic understanding of anatomy will enable you to experiment confidently, nothing is set in stone. Different people have very different features.
Here I will show you how to draw faces easily. Starting from scratch I will offer advice on how to draw a face and help you improve your skills.
Then we will try to look at creating personality and how to show different expressions in any kind of portraiture.
Learning how to draw faces and heads realistically is a skill you will need to practice.Once you learn the basic anatomy of the face, you will understand how to place the eyes, mouth, nose and ears in relation to each other.
Table of Contents
A Good Place To Start
Choosing a strong paper will make erasing lines easier. Some people prefer putty rubbers but I personally use several kinds depending on the paper used. Pencil choice is another subject of much discussion. You will use several types at different stages.
To begin with, you want to sketch quite lightly. I prefer to use a HB or B with quite a rounded tip to start the initial sketch. Allow the tip to lightly brush the paper to leave a light line that will just guide you later in the drawing.
Using Different Pencils
As you begin to add more definition you will need well sharpened H, HB and B pencils to add more solid lines. Using an H grade pencil will give you crisp lines but they aren’t so dark, that means as you add shading you will work over the line more. You may prefer using a HB or B to darken lines and give you more pronounced shading.
This is for a basic front on view of a face which is the best place to start. As you progress you can do side views, and then, using triangles as described you can begin to draw a head from any angle required. You will see the same geometry whatever angle you view the face from

Using Circles And A Grid
Start off by drawing two circles/ovals; the upper one should be slightly larger than the lower one.
Draw a horizontal line where they intersect to give you the lower level of the eyes and the upper level of the ears.
From there, draw a centre line vertically down the two circles. This gives you the nose line.
Draw two lines vertically down from the points where the 2 circles cross. These lines mark where the forehead and cheekbones sit.
From the centre intersection, draw a triangular shape for the nose which reaches down to the base of the upper circle, but remember the top point doesn’t quite join.
At eye level there is a gap which forms the bridge of your nose and from this point the line should arch up and outwards to form the brow ridge.
Now, mark out where you want the mouth to be. It should sit a little but not too far below the nose and roughly level with the bottom of the ears.
Draw two ovoid shapes for the eye openings – these will also help you place the eyebrows and shape the brow ridge.
You now have the position of the ears and you can add the distorted oval shape where they will sit at the junction of the 2 circles.

Anatomy Basics
The space between the eyes is one eye width.
If you draw 2 lines vertically down from the inner corner of the eyes, it will roughly line up with the edges of the nose (depending on nose type).
Both eyes should be at the same height and look in the same direction.
The top of the nose ridge should be roughly level with the top of the eyes opening.
Draw 2 lines vertically down from narrowest point of the nose ridge, it will roughly line up with the philtral ridge (the indentation below the nose that forms the central part of the upper lip).
If you draw 2 lines vertically down from the centre of the eyes, it will roughly line up with the outer edges of the mouth.
Then draw a line horizontally across the top of the eyes, it will roughly line up with the top of the ears.
If you draw another line horizontally across the base of the nose, it will roughly line up with the bottom of the ears.
Remember, no-one is exactly the same and no-one has a perfectly symmetrical face. It is also rare that any portrait will be perfectly straight on.
Proportion
The guidelines above are just that, a rough guide to help you place the facial features correctly in relation to each other. They will help you keep any face in proportion.
As you sketch in each feature, look for the size and shape of each part. Don’t get hung up on details at this stage, all you are doing is sketching in the basic shapes and their sizes.

Look For The Differences
Your subject might have large almond shaped eyes, or elongated ears. Both are common differences and there are many other differences in every human face.
As you sketch, look at your subject to see each difference. If their eyes are wider, place them in that position. Check to see if their ears or nose sit slightly lower or higher than in the rough guidelines. If they do, draw them like that.
Concentrate on creating the overall outline shapes which you can add the detail to as we progress.
Facial Shape
Every subject will be different. If the Jaw-line is angular, sketch in that shape. Look if the forehead narrows or gets wider and draw the shapes you see. Adjust the shape to create their actual features.
You will see lines all over the face. Add them in to help create the shape of each feature. Personally I usually start with the eyes. Sketch in bolder lines to define the shape of each eye, the brow ridge and nose.
Remember, use the size and position guides above, but change those basic guides into the size and shape of the face you are drawing.
Some faces will have a wider more pronounced bridge to the nose which reaches almost to the inner edge of the eyes. Other people have a narrower nose bridge with a wider gap either side and deeper set eye sockets.
Each section you draw should be fitted and shaped so they sit together in a natural way.
Remember, no one has a perfectly symmetrical face. Draw each section as you actually see it. Don’t get hung up on what you “think” it should look like.
A good exercise here is to take some front on photographs of a variety of faces. Use an art program like Paint.net to change the picture to black and white and increase the contrast to give you more defined details. If you need to, adjust the rotation of the image to level it up properly.
Draw in the grid lines described above on each face. Draw the lines perfectly vertically and horizontally so they line up with one of the features, i.e. draw a line horizontally across from the top of one of the eyes. You will notice it will not quite line up with the top of the other eye.
Symmetry
Do the same with the lines for the nose, mouth and ears and look at the slight differences in each face that make it not quite symmetrical. These differences are what will give each portrait its character.
Front Or Side View
The guidelines above are for a front view of the face, but they apply in a similar way if you are drawing a profile view. Collect a selection of pictures you can refer to.
Start as before by drawing a circle. Then draw two intersecting lines to form a cross which cuts the circle into four equal parts. Add a square inside the circle that touches at each corner.

Using Vertical And Horizontal Lines
The top line of the square will form the hairline. The middle line will become brow ridge and the bottom line will give you the position of the base of the nose.
Start to create the jaw-line by duplicating one of the smaller squares below on one side. You can see here I have drawn it so the chin will be on the left.
From the furthest left point of the circle, draw a curve that reaches the lowest left point of the lowest square, and then another curve back up from the tip of the chin to the centre point at the bottom of the original circle.
Draw a gentle curve from the base of the original square to meet the rear of the circle. This will form the shape of the base of the skull.
Placing The Features Of The Face
Use the centre line of the circle as the upper edge of the eye to help you place the features.
The centre line forms the placement of the brow ridge, the upper edge of the eye socket and the upper edge of the ear.
The lower line of the original square helps you position the lower tip of the nose which should line up with the lowest point of the ear lobe.
The front edges of the ear should sit on the centre line of the original circle. This will also give you the position of the rear of the jaw line.
The position of the mouth can be worked out by splitting the square that forms the jaw-line into quarters. The horizontal line will be the lower lip line and the mouth will reach back to the central vertical line within this square. The upper lip should roughly line up with the front of the eye

Adding Detail
Now you can start to add bolder lines and begin shading to help create a more accurate shape. Begin to shape the features.
Draw a rough line to give you the shape of the outer edge of the hair and add two lines for the neck remembering that the head will always sit slightly forward on the neck as it joins the spinal column at the back of the neck.
Now add some real detail. It is prudent at this point to erase most of the initial guide lines and make a few copies so you can try different ideas.
Drawing Eyes
Once you are happy with the shape of the face look at the eyes. Start by drawing the curves that form the shape of the eye. Then look at how the circular shape of the iris fits into those curves.
You can start to create depth by emphasizing the curvature of the eye with light shading.
You will see the vague shape of the pupil, but its dark colour means that reflections will often dominate the central eye. These can be quite random in shape. Pick out the shapes and look at the way the lines of colour radiate across the iris. Draw the darkest areas first and gradually add the lighter shading.

Keeping It Simple
Keep it simple and build up the shading to create the shape of each part of the eye.
The lip of the eyelid and the curve of the eyeball itself can be difficult. Take your time and don’t be frightened to move on, you can come back to it later if needed.
Introducing the curves and lines of any folds of skin around the eye will give you chance to experiment with expression. Always look at how the light creates shape with shadow; this will give you the expression of the eye.
Add the eye-lashes and any final shading around the eye. Imagine a ball sat in a shallow hole, wherever the light source is, the shape is created by the shadows. Use those shadows, they are your friends. Use a sharp pencil to emphasise the shape of certain details like the eye-lashes.
In general I start with a fairly sharp H or HB grade, then use a 3B to emphasise the darkest areas. Use a rounder tip HB, B or 2B to soften the image and create the gradient of tones within the shaded areas.

Drawing Noses
Noses can be difficult, but I will explain what I do as simply as possible.
Look past the nose, to the shapes and tones. It is these that will create both realism and emotion in your drawings.
Think about the various shapes and how they fit together. Once you are happy with the basic shape, look at how the curve of each nostril joins the basic triangular shape of the nose. You can create depth by emphasizing the various curves with light shading.
Although you may see the vague shape of the nostrils, much of their shape will be created by the shading.
Build up the shading to emphasise the curves and creases.
Draw in the lines of any folds of skin around the nose and build up the shading to emphasise the curves and creases. This give you another chance to experiment with expression.

Using Light And Dark
Look at how the light and shadow create shape and depth of expression.
Add finer details and any last shading around the nose to merge it into the rest of the facial features.
I use a variety of pencils to emphasise the shape of certain parts of the image. You will be amazed at how subtle differences in shape and tone can help you create expression.
As you draw different noses from the reference material you have collected, you will see how the methods above can help you create more lifelike and expressive drawings. This will bring each drawing to life.
The nose can be the most striking feature of a portrait, and time spent here can make the rest of the face much easier.

Drawing Lips
Drawing the lips and mouth can be a challenge, but you can break the whole process down into a series of relatively simple tasks.
Look past the mouth to the basic shapes and tones. They will help you create realism and emotion in your drawings. Collect a selection of photographs, sketches and drawings of as many different mouths as you can for reference.
Start by drawing the shape of the opening. With a closed mouth this would be a single line, but with an open mouth it becomes 2 lines joined at the ends.
When you are happy with the shape of the opening, you can look at how the upper and lower edges of each lip join to that shape.
Study how those lines narrow at each end but follow similar lines, to create the overall shape of the mouth.
Adding Depth
You can add depth by emphasizing the curvature of the lips with light curved shaded lines. Soften the upper and lower edges of each lip to emphasize the central opening.
Look at the contours of the lips in your reference material. The lines you draw should follow these contours.
Build up the shading to create the shapes you need. Add any folds of skin around the mouth to add more expression.
Remember, the light and shadows create the shape. They bring depth and expression to your drawing. As you add any final shading around the mouth, look at the effect of the light source. This will help you bring the expression to life.

Drawing Ears
Depending on the hairline, from a front view, the ears can be partly hidden. However from the side their complexity becomes obvious. They are made up of many intricate shapes. Use a grid to help make the job easier.
Some things to bear in mind when you start are that the outer ear overlaps the inner ear. The inner ear has an area that looks like a Y. Look for it in every ear you draw.
The skin of the ear is oilier, so it often shines and highlights can appear very bright. There is an area of the inner ear that sticks outwards and acts like a cup so you need to create depth within the ear as you draw. The earlobe itself often looks like a small sphere and will be squashed or stretched depending on the subject and the angle of viewing.

Drawing The Neck
From the front, the narrowest point of the neck should be in line with the outer edges of the eyes. You can then overlay a curved line to show how the neck gets wider where it joins the skull. Then draw a wider curve from the narrow point of the neck down to the shoulders.
You should remember that the spine is attached at the rear of the skull and this means the head sits forward of the neck and shoulders not directly above. This is easy to show in a side on profile, but in a front on profile it will involve introducing deep areas of shading.
Start the shading using a fairly blunt “B” grade pencil and work lightly on the paper, gradually adding layers to emphasise the shape.
Crosshatching can help create darker areas in an already shaded piece of the drawing. Work by introducing lines at 90 degrees from the direction of the existing shading where you want extra depth.
Even in the darker areas there will be highlights. Use a good putty rubber to lift off a little pencil where needed to create the lighter areas.
Remember the neck is just a cylinder shape. The shadow will usually be more on one side than the other.
Shading
To portray a face accurately in a drawing, you will also need to get the shading right. Shading is simply the process of adding dark and light tones.
The specific values of light and darkness tell the viewer where and how strong the light is. This creates the illusion of shape.
Understand how light works. imagine the head as a cube and look at how light from a particular source would fall on each surface. This will help you better understand how light works and how it will affect your picture.
For every area of light there is a corresponding area of shadow. These changes in the angles of the face produce different levels of shade depending on their location and the strength of the light source.
In most natural pictures, the light source will originate from above. This produces areas of darker tone in locations that recede and lighter ones in locations that stick out.
This means that recesses around the eyes, under the nose and blow the chin are mostly shaded darker. Areas that protrude, like the nose, cheekbones, and lower lip will be lighter.
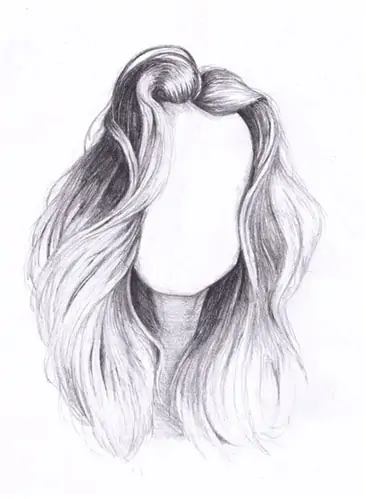
Drawing Hair
First draw in the line of any parting, then draw a rough outline of the hair shape around the face.
You should begin to develop the flow of the hair with longer lines gently flowing down, but keep in mind that you’re not drawing the single hairs here, just their flow.
Hair doesn’t lie flat and one of the ways you can show volume is by drawing in the hairs as they rise from the scalp at the front and along the parting.

Creating Volume
Remember, each hair is grouped into strands and this is what you see. There will be stray hairs that break up the edges of each strand and as the strands get longer they will divide up into smaller strands.
Texture
Draw lines that follow the direction the hair. The highlights can be lifted out with a putty rubber. Don’t draw straight lines. The strands will run into and away from each other to form narrow “Y” shapes, but allow the tails to separate so you end up with “Y” shapes that are upside down as well as the right way up.
Flow
You should now emphasise the way the hair rises along the parting. Work on defining the complete outline of the hair.
Draw smooth lines that follow the flow of the hair. Work lightly and don’t press too hard, hair has soft edges. You don’t want a hard outline.
Shading The Hair
Draw longer lines along the strands to give the hair more detail and add depth to the haircut.
You should work lightly, and don’t draw the lines too close together.
When shading, think in terms of the strands and not single hairs. Remember the light areas are just as important as the darker ones. Adding stray hairs here and there will make it look more realistic.
Build The Hair Up Gradually
Work from the parting outwards. Build up the thickness of the hair using long pencil strokes adding shading to introduce the illusion of both depth and form. Blend everything out smoothly and then lift areas of light out of the hair with a putty eraser.
Some things you should always remember are
The stroke of the pencil should always replicate the direction and length of the hair.
The dark and light of your pencil lines are what will illustrate the colour of the hair.
Everywhere there is a curved area of hair there will be a band of light created in the hair strands. You can see it really easily in curls and around the sides of the head.
Lift out highlights with a putty rubber when needed. This makes the hairs look like they are on the outer surface.
With frizzy or permed hair the curls are less distinct because of the random way the hair changes direction and overlaps adjacent strands.
Using Triangles
You will rarely have a portrait where the view is straight on. It might be viewed from any angle. I use a technique called triangulation to make things easier.
There is always a triangle formed by the eyes and mouth. When you begin a sketch try to visualise these 3 points and you can use them to place the remaining facial features more easily.
The ears and nose will always be in a similar position to each other. If viewed from above the triangle may well appear more squashed and if the head is tilted, extend the line between the eyes you have visualised to help you place the ears correctly in relation to the eyes.
Squashing And Stretching To Create Expression
Once you have got the basics it’s easy to start having some fun with your portraits. As a general rule, try to exaggerate the expression of the face to emphasise the emotion in your drawing.
Start with something simple and try to capture the emotion you want. Look in the mirror and exaggerate your facial features. Trying to look shocked or surprised isn’t easy, but try it. Look at how it affects each part of the face and then try to put those emotions into your drawings.
If you are drawing a character, try to understand who they are and how they are feeling. Act out the expression, using a mirror or use photographic references to help you capture the emotion.
Adding Character
Adding facial lines can emphasise an expression, but it’s important to bear in mind the age of the subject. The more character and emotion lines you draw on a face, the older the character will appear.
Younger characters will usually have fewer lines around the eyes, forehead and mouth. This is another example where a reference library of faces young and old, angry and sad, male and female, can really help.
Try to make it as comprehensive as possible; every emotion you can capture will be useful at some point.
A slightly raised eyebrow or smirk can be really effective. Adding just a touch of emotion or quirkiness to the character can make them feel more natural and lifelike.
Creating Expression And Emotion
Adding emotion and expression will then really bring each face to life. Try to watch the people around you as you go about your daily life, look for the subtle differences that help you read the emotion on people’s faces. These differences can be used to help you portray the expression and emotion in your drawings.
Start simply
To begin, draw a basic stick man type face from a front on view. Repeat the outer circle of the face to fill the page with a series of these circles in a grid about 4 faces wide by 5 faces high and draw a set of features on each one. The position of the various features won’t change much, but by altering the shape of those features you can reveal emotion in their faces.
We have all seen a furrowed brow and lowering the inner edge of the eyebrows and raising the outer edge will completely change the expression of the face. Draw and exaggerate the features on each of the various circles you have drawn.
With the eyebrows, first draw them in a “rest” position, simply following the line of the eye. Then as described above draw them with the inner edges lower and the outer edges higher. On the next try reversing that and draw the inner edges higher and the outer edges lower. Finally, draw them with the central area of each brow raised and the edges lowered to exaggerate the arch of each brow.

Draw The Differences
In the next row repeat the process with the eyes themselves. You can draw one normally, the next drawn as more of a circle to show the eyes opened right up to their widest. Next depict them as a single line to show them closed, and next maybe as a slight curve to make them appear as if looking slightly up or down with a small opening.
The mouth will change each one again. Draw a normal mouth, then a mouth that is wide open. Use a simple down-turned curve to show a frown and an up-turned mouth to show a smile in the next 2 and you will see the effect these simple changes can have.
You may think that your nose doesn’t move much and in truth that is right, but it does move as your expression changes. Look for those subtle movements as you talk to people. In our simple stick man faces these differences won’t be as obvious as the changes of the mouth and eyes, but draw 4 simple, slightly different nose lines. One to depict the nose “screwed up” one as normal and the other two as more and less exaggerated versions on the original nose line.

Use Your Imagination
This will leave you with 4 faces left empty. Look through the faces you have drawn and try to fit different elements together in different ways. Each will reveal another emotion. When your first sheet is complete just do it again! Look at the various components and try to bring them together to create HAPPINESS, ANGER, SHOCK, SURPRISE and more.
You can see some really good examples of this applied to cartoon faces on the blog here, .
I have pages and pages of these practice sketches for reference and the simple fact is that practice will make it all seem simple in time. What may now seem almost impossible will become second nature to you as you practice and experiment more.
Remember, There Are No Fixed Rules
I hope these hints and tips help you understand how easy adding emotion to a face can be. Remember, sometimes breaking the rules can give you the effect you want. Don’t be frightened to experiment. The worst that can happen is you sketch a face with an unreal looking set of features.
Learning how to use expression to portray emotion will help you improve immeasurably as an artist.
Enjoy Yourself
Don’t get too hung up on the results to begin with. It can take time to understand the different ways you can do draw faces, but as your technique improves, so will your results.
Feel free to forward this to any friends you think will be interested, and send us the results of your efforts. It is always great to see the drawings and paintings people have been inspired to do.


")
